For this Halloween, I built this haunted mirror display for the porch that turns any trick-or-treaters extra spooky. Using the voodoo power of AI, those who gaze into the mirror will be treated to a visage of their best Halloween self. See below for code and build tips if you’re interested in making your own!
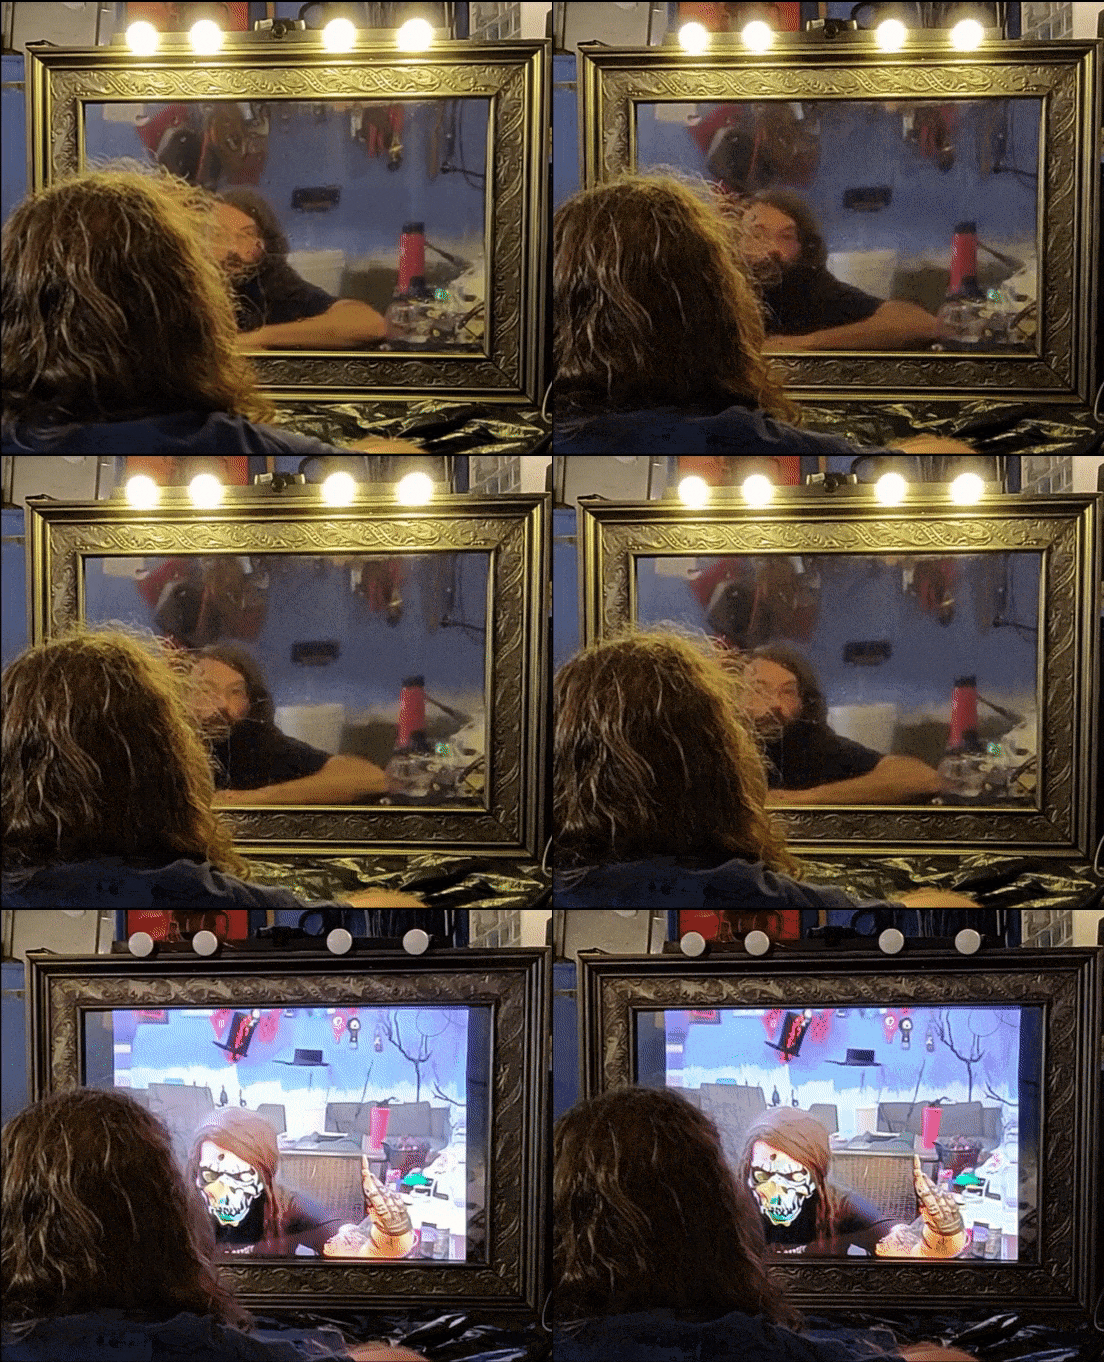
Build details in a nutshell:
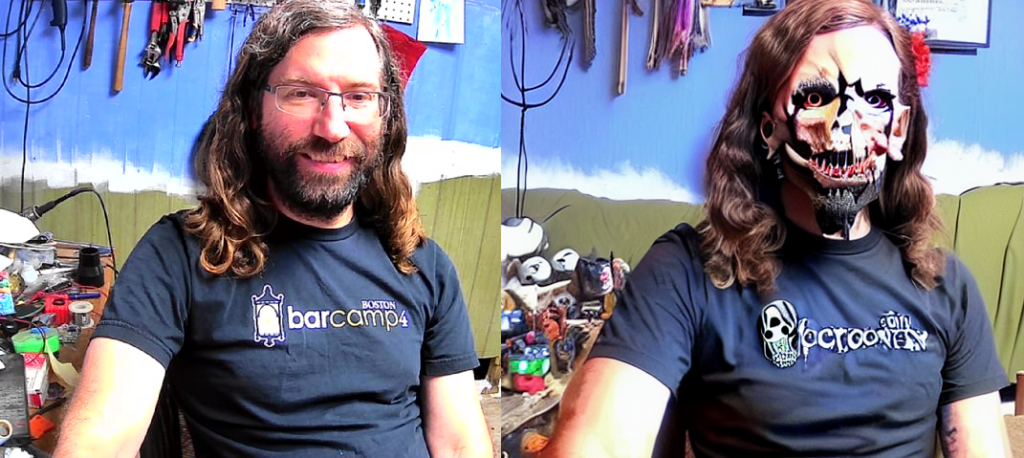
The main active bits are a webcam, OpenCV, a computer running the Stable Diffusion AI image generator, and a monitor hidden behind 2-way (partially mirrored) mirror glass. A Python script running on the computer driving the screen lies in wait, grabbing frames from the webcam and looking for faces. If a face is detected (someone is looking at the mirror), the frame is kicked off to Stable Diffusion using the ‘img2img’ mode and a suitably spooky text prompt, weighted to make eerie modifications to the image while preserving the subject’s pose, costume and overall scene. When it finishes, the viewer’s real reflection is replaced with the haunted version.
To contribute to the effect, a simple Arduino-based lighting effect provides the scenes a faire electrical disturbance that no horror film is complete without. This actually serves a couple practical purposes. Mainly, it helps sell the ‘mirror’ effect on the 2-way glass (strong front-side lighting for ‘mirror’ phase, which is abruptly cut when it’s time for the hidden screen to show through). But since the image generation takes a few seconds, this also shows something is happening, ideally keeping the hauntee’s gaze until it’s ready.
The below details what I did to build the one shown here, but there’s plenty of room for improvisation.
Software/Electronics guts:
First things first, for the actual code, see this GitHub repo. Beware it’s pretty rough-n-ready, improvements (pull requests) welcome. There are two parts, the Python script for the PC and an Arduino sketch to run the optional lighting effect.
This build is based around the AUTOMATIC1111 Stable Diffusion Web UI, which must be downloaded separately. This is probably the neediest part of the build, requiring a crapton (some GBytes) of disk space and a moderately powerful video card capable of running it (NVidia, AMD, Intel; ~4GB+ VRAM) and at a reasonable speed. I’d recommend getting that working before proceeding with the rest. From here on, I’ll just refer to this bit as Stable Diffusion or SD for short.
Required parts for the core effect:
- LCD Screen (TV/computer monitor)
- Webcam
- Computer with a moderately powerful GPU
- 2-way mirror (see below)
- Optional: 2nd computer (low-power SBC or old laptop is fine) to run the display, if you don’t want to lug your beefy desktop outside
Assuming you have at least some familiarity with Python, grab the code from the GitHub links above (if this is new to you, try the Code -> Download ZIP option), and see the README for each for setup instructions (dependencies, etc). Again, I strongly recommend getting the Stable Diffusion Web UI working first and generate a few test images. Make sure you have a recent Python 3 installed (The WebUI setup may handle this for you if you don’t). While this is normally used via a graphical Web browser interface, we will be using a builtin API to control it headless from another script. Be sure to add the –api and –listen parameters to its command-line configuration (again, see README).
The hauntedmirror.py script does the actual image display and can, but does not have to, run on the same computer as SD. Unlike Stable Diffusion, this end of things is fairly lightweight and can likely be run on your favorite compound-fruit-themed SBC or other old hardware you have kicking around, and talk to the SD backend over a local wifi network. Either way, all image processing happens locally by default; no pictures of other peoples’ kids are sent off to random 3rd-party servers1. OpenCV is used for the face detection and image display, using a Haar cascade classifier for the actual detection. This is not exactly state-of-the-art, but pretty lightweight and gets the job done. It doesn’t have to be perfect; the face detection is only used to trigger frame capture and isn’t used in the replacement image generation.
Before running the hauntedmirror.py script, adjust a few settings near the beginning (again see README), including IP address and port of the Stable Diffusion instance (if different), COM port to communicate with the optional lighting effect, some image sizing parameters, and of course the SD parameters themselves. The out-of-the-box defaults are a good starting point, but one thing you will definitely want to tweak is the ‘steps‘ parameter, which basically trades between image quality and processing time, and is heavily dependent on your GPU hardware. Higher is better/slower. In my testing, a value of 8 is about the lower limit to produce good image results, and brought the image generation time down to ~3-5 seconds on my admittedly dated NVIDIA GeForce GTX 1080 video card. Embellishments like the lighting effect or reading material stuck to the mirror (“Found this walled up in my Salem attic. Totally not haunted! – Grandma”) may help paper over the delay, but hungry trick-or-treaters tend to be goal-oriented and won’t wait around very long for something to happen.
One thing I didn’t do so far (patches welcome) is add any support for scaling, cropping, etc. the webcam image so that the displayed image perfectly matches up with the physical reflection. This depends on camera placement, its output (physical zoom) and the display size. In my case, the large monitor worked out about right for scale, and vertical offset (from the camera being at the top of the monitor instead of the center) was mostly mitigated by just angling the camera slightly downward. Since the processed image is based on a frame captured several seconds ago, I figured getting it to perfectly line up with the subject was a lost cause for me, but folks with extremely fancy-fast GPUs may want to give it a go. Likewise, I didn’t put much effort into tweaking the resulting image aspect ratio to perfectly fill the screen. It came pretty close out-of-the box, and I couldn’t find a way to change OpenCV’s gray window background in the time I was willing to spend, so I just covered the gray bars on the edges of the screen with black paper.
OK, onto the actual diffusion parameters. Knowing a bit about how SD works under the hood is probably helpful, but not required to get decent results. This effect uses the ‘img2img’ mode, where instead of starting with a pure random noise image to clean up using the trained model and text prompt, a controlled amount of noise is added to a chosen source image instead. The amount of starting noise can be tuned using the denoising_strength parameter, ranging from 0.0 (unmodified source image) to 1.0 (pure random noise). In my experimenting, a value around 0.45 was a fairly narrow sweet spot where spooky elements were added well but the overall source image was preserved2. For me at least, the victims seeing what is obviously themselves in the mirror rather than a random jump-scare image was a big part of the appeal; striking the desired balance in your own setup may take some experimentation. Likewise, the weighting of the text prompt is adjustable (cfg_scale) and can range from 0 (ignored) to 30 (hyperfocus). For the text prompt, values in the range 5-15 seem to work well, and high values tend to produce a kind of burned-out cartoonish look. As for the actual text prompt, extremely generic prompts like “ghost”, “spooky”, “creepy”, etc. seem to work well across input images and mostly affect faces, while more specific prompts had more mixed results. Sadly, prompts like “face covered in spiders” didn’t work as well, because that would have been awesome.
Model is selectable here as well, but loading a new model on the fly takes a rather long time and will cause the first run of the script to fail reliably until it finishes. Model selection can also be done via the browser UI. The SD setup will automatically reload the last-used model on startup, avoiding the issue going forward. Just beware, if you were already using SD and dabbling with any, ehem, ‘NSFW’ models, you’ll probably want to double- or triple-check that a safe model is being loaded before any hapless trick-or-treaters get an eyeful.
For my setup, I tried the dreamlikeDiffusion and Dreamshaper models and both produced pretty solid results. The latter tended to alter the background more for the same denoising_strength. Oddly, both of these seemed to work better than a model specifically suited to the theme (creepy-diffusion), which tended to produce a small set of pretty samey monster faces.
Parts for the lighting effect (optional but recommended):
- Arduino-compatible (or whatever) microcontroller board with a serial port
- Breadboard / Veroboard / etc. (optional)
- 5V white LED modules – I used “star” types
- Aluminum L bracket (heat spreader, for higher power LEDs)
- Ping-pong balls (light diffusers), if you don’t like the look of the stock LEDs
- Medium-power NPN transistor (enough to drive your LEDs)
Again, the light effect is not just for flavor – it hints to the viewer that something interesting is happening while the SD backend chugs, helps modulate the 2-way mirror effect, and gives you more flexibility on ambient lighting. The max and min brightness are configurable, giving another knob to turn to ensure the camera is happy, the mirror is properly reflective when the screen is dark, and control bleed-through for monitors with poor contrast or the brightness cranked up to compete with bright ambient lighting.
For an easy bolt-on lighting assembly that doubles as a heatsink, I spraypainted a piece of aluminum L-bracket black and glued the LED stars to it with some JB-Weld. The bracket was reclaimed from a past project and already had some mounting holes drilled, as well as a suitable notch in the middle for the webcam to poke through.
Don’t ask me why, but I really wanted that canonical ‘vanity mirror’ lighting look with the little round bulbs, and didn’t find any low-voltage LEDs like that available off-the-shelf, so I ended up getting a handful of 3W ‘star’-style modules (high-power LED mounted to a circular aluminum PCB), cutting the ends off of some Ping-Pong balls and gluing one over each LED.
For mine, I used a spare Arduino-compatible board I had left over from a previous project (Sparkfun RedBoard Turbo), with a 5V wall-wart power supply. I used ‘warm white’ 3-watt LEDs specifically sold as “5V”, which included an appropriate current-limiting resistor for 5V operation right on the module. The driver circuit I used is basically one NPN power transistor with a non-critical base resistor (300 ~ 1k ohms). The schematic is shown below, with the gray boxes representing the LED modules with internal components. These LEDs came from the usual overseas sources with some reviews hinting at ‘optimistic’ power ratings. But between the transistor (which drops ~0.7 volts) and the chunky aluminum bracket I glued them to, I didn’t run into any excessive heating or other issues, and they were still plenty bright.
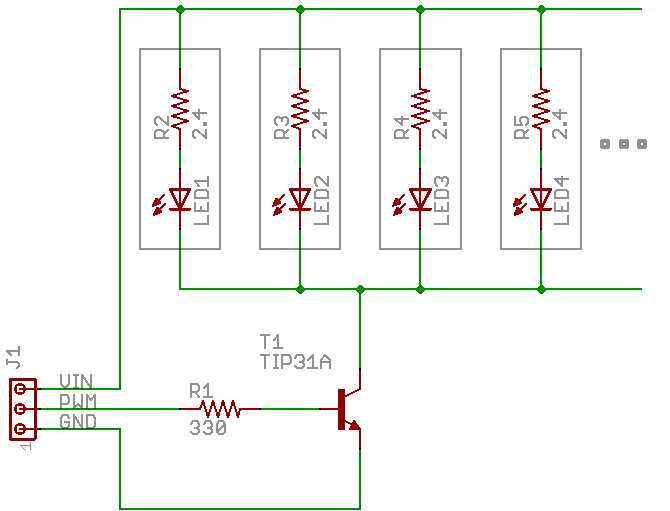
The Arduino script is dirt-simple and just receives one of three ASCII characters over the serial port to set the lighting mode (Lit, Flicker, or Dark) and modulate the LED brightness via a PWM pin. In the Flicker mode, the brightness is linearly faded between randomly-chosen levels. This gives it the feel of the smooth ‘flickering lights’ trope of old horror movies, where someone was probably off-camera literally flicking switches, but the hefty movie-set incandescent bulbs of the era took some time to respond.
Mirror and Frame:
- Frame – buy or build
- 2-Way Mirror (or acrylic sheet and mirroring film)
- Screws or other mounting hardware to attach the mirror
I wanted a frame that looked suitably dated and worn out. The nearby big-box arts & craft store had some faux antique gold/bronze frames that looked the part, but were pretty expensive for a one-off project (>$80) and would have needed modding to fit the desired monitor size, so I ended up just buying some moulding from the hardware store with an antique-looking pattern embossed into it along with a couple cans of spraypaint, watching some ‘antique frame look’ how-to videos and crossing my fingers. All told, this probably didn’t actually save any money, but was more fun.
Have I done this before? Hell no! But that’s the beauty of Halloween decorations, they’re temporary, it’ll be dark, and they’re supposed to look kind of decrepit, so if you really #@$% it up, you can just say it’s intentional.
The frame shown was made from “6702 11/16 in. x 3-1/2 in. x 8 ft. PVC Composite White Casing Molding” by Royal Mouldings, and starts off white. An up-front caution, especially with the fairly wide stuff shown here, it takes unintuitively more linear material than you’d think by eyeball – remember you need to account for the longest (outside) edges of 4 mitered sections, so math it out ahead of time if there’s any doubt (for the monitor shown, a single 8-foot piece was not enough and I had to go back for seconds).
The frame was shaped using a hand saw and a cheapo miter box, and it probably shows. Needless to say, the edges don’t quite mesh but, eh, it’ll be dark. To give it something approximating an ancient bronze look, I first gave the white vinyl moulding a coat of black spraypaint, then immediately started rubbing it off with a paper towel soaked in rubbing alcohol. The results were extremely inconsistent, exactly as desired. The paint dried very quickly and this method soon became ineffective, so I lightly sanded the surface with fine (320-grit) sandpaper to lighten up some of the edges and high spots in the pattern. Honestly, this looks pretty dilapidated already and I could have probably stopped there.
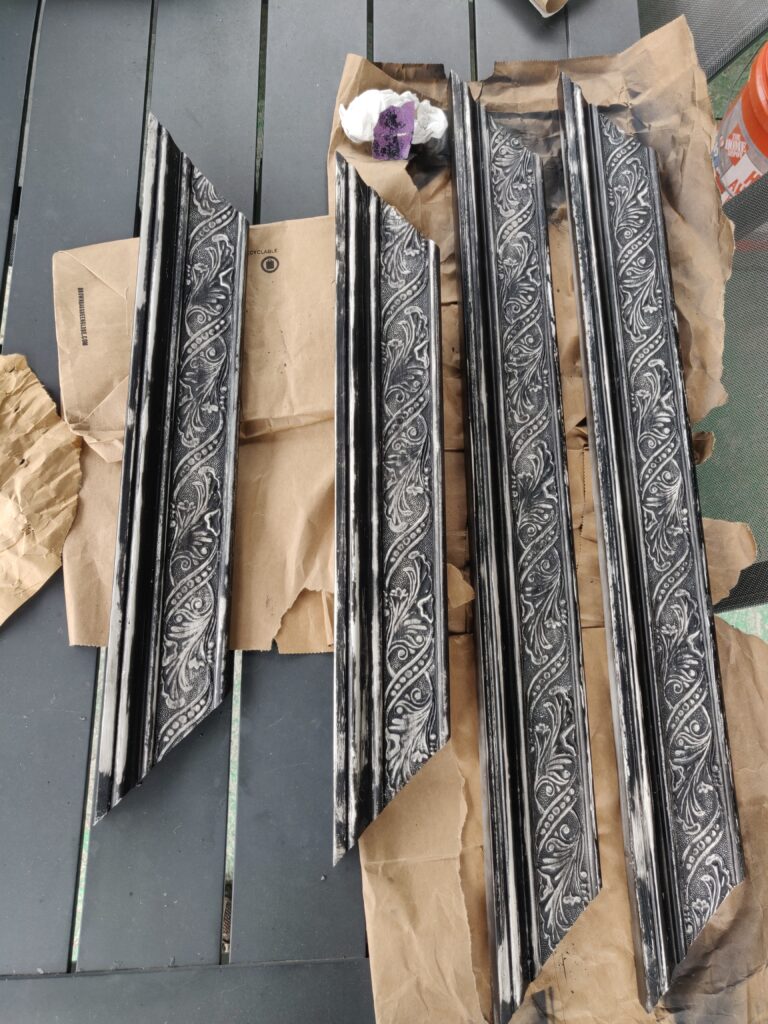
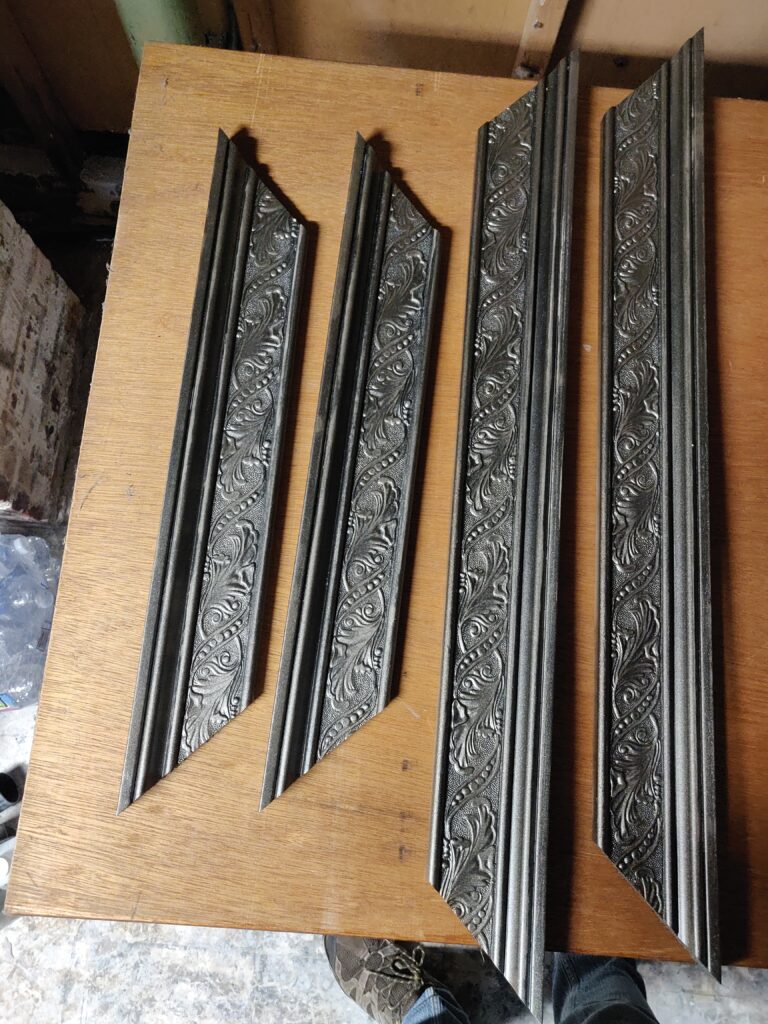


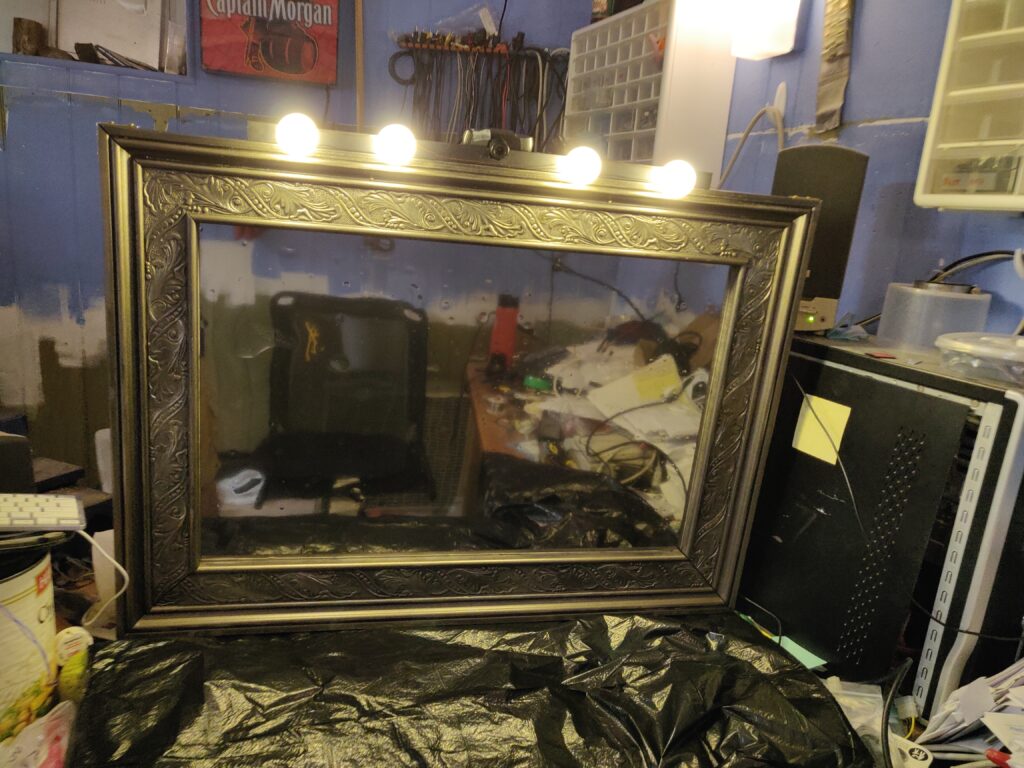

Next, I sprayed over this with what I hoped was a light coat of a dark metallic bronze. In retrospect I think I overdid it a bit. The idea was for the lightened-up spots to show through and give an inconsistently tarnished look, with the highlights on the raised edges giving that natural “someone’s made a half-assed effort to polish this for the last century” look of bright & shiny on the high spots and more grungy everywhere else. Since that didn’t really show through as well as I liked, I ended up lightly dry-brushing some random raised parts of the pattern with some Testor’s gold model paint. Dry-brushing is exactly what it sounds like, taking a very small amount on a paintbrush and spreading it around until the brush is bone-dry and it will spread no more (more or less). Kind of a subtle effect, but made it look a bit brighter and less uniform.
For the mirror part itself, I used a plain sheet of hardware-store acrylic and some reflective “one way mirror” privacy film intended for windows. The instructions for the film called for liberally spraying the ‘glass’ surface with soapy water, peeling off a protective film to expose the adhesive side, shimmying it into place on the wet glass, then chasing out any liquid & bubbles with a squeegee. It might be due to the acrylic being slightly bendy or me doing a half-assed job, but after chasing out what I thought was all the liquid, what remained coalesced into watery bubbles throughout the surface overnight. This warped the reflection and kind of amplified that “ancient and decrepit” vibe, so I left it that way.
To assemble the frame and affix the ‘glass’, I used some flat right-angle brackets from the hardware store between the mating sections of moulding, securing the sections together and pinching the glass to the frame. Since the frame was large and getting kind of heavy, I added a set of L-shaped corner braces around the outside edges for good measure. Finally, to attach to the monitor I added a broad L-shaped scrapwood bracket that just hangs over the top edge of the screen. The trash-picked monitor I’m using is pretty nice, but has some weird Dell mounting system rather than standard VESA mounts.
- A bit academic given they have probably passed by a dozen Ring video doorbells on their way to your porch, but you don’t have to uncomfortably answer any questions about likeness rights, GDPR, commercial use or whatever. Cloud-hosted GPUs and 3rd-party SD hosts are a thing, but setting this up is left as an exercise to the reader. ↩︎
- This was the simplest, but there are more knobs to turn here. The prompt editing feature in particular may be useful. ↩︎

Leave a Reply