Or: Tim reverse-engineers an open-source product to reconstruct the open-source materials!
Long story short, I picked up this Autodesk “open-source” (words I thought I would never hear together) stereolithography printer at a local freecycle event. I thought it was a vacuum cleaner until I saw the Autodesk name on the back label. On realizing what it really was, I knew it was coming home with me even if it meant spending most of my “ask forgiveness not permission” spouse points for the year.
Now then, I say “open source” in gigantic air-quotes here because, released in 2015, this ten-year-old 3D printer may as well be a pottery shard dug out of a cave for all the information that can be found on it online. Maybe Autodesk reneged on the FOSS licensing and DMCA’ed all republished documents offline it wasn’t very popular or something, because most of the published details, at one time including hardware design, BoMs and even an open-source resin recipe, have all but disappeared from the Internet. I mean literally, you can’t even find a copy of the user’s manual. All official information from Autodesk itself appears to have been forcibly scrubbed (now returning NXDOMAIN, or random ads, depending on your ISP – and not available on Internet Archive either1). Pointedly, Autodesk’s slicer for this printer (a Fusion 360 plugin, not a standalone program) was never open-sourced, and is now extremely discontinued. But I have a new toy and actually want to play with it, so it’s time to do some digging!
Keep reading for some technical details and recovered documents, or skip below if you have one of these and need a replacement slicer!
Key Specs
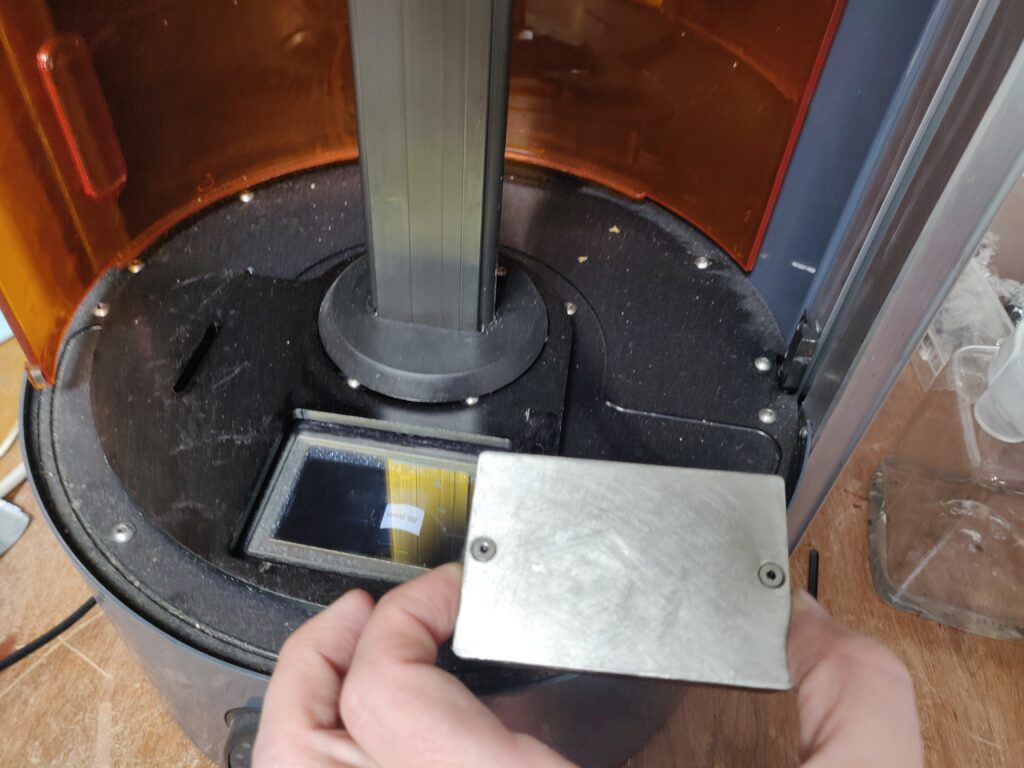
The actual display is 1200 (wide) x 800 (tall), with each pixel covering 50 microns of build plate. The usable build volume is reported by 3rd-party sources (and AI scraping of same) as 64 mm (x) x 40 mm (y) x 134 mm (z). Where the extra 4mm on the X-axis come from is anybody’s guess (.05mm * 1200px = 60mm). The printer comes with aluminum buildplate ‘heads’ which are a bit larger than these dimensions, more on that later. Images sent to the DLP need to be horizontally mirrored.
According to a random Instructables user who may have been involved in the design, the target light intensity is 20mW/cm^2, and is likely in the 385-405nm wavelength range (near-UV). The LED irradiance can be calibrated by adjusting the LED current in the printer settings (see “On-Printer Settings” below).
Resin Sources
Original Resins:
- Autodesk-branded, “PR48” (clear)
- Autodesk-branded, “PR57-K” (may include a version number like PR57-K-v.2)
The Autodesk-branded resin is long gone of course (the recipe was published, see below), but Colorado Photopolymer Solutions still sells what appears to be a compatible clear resin (PR48), along with replacement Ember resin trays. At the time of this writing, their website warns they only sell to US business addresses, and finding documentation on the sold products is less than intuitive (Googled up datasheet link). The single short page reports that “PR48 is formulated to work with DLP and SLA 3D printers using 385-405 nm light. It is specifically tuned to print on the Autodesk Ember printer. PR48 will extend the window lifetime of the Ember and other printers that use PDMS windows. This resin reliably produces clear prints with good positive and negative resolution.” (Emphasis mine)
While the flip answer is “any resin for 385-405nm light” ought to work with some tweaks to the exposure time, it sounds like there may be particular formulations for printers with a PDMS exposure surface (window). Unfortunately, directly searching this just turns up resources and products about designing with PDMS. If I ever find out more, I’ll update this (if you know something, feel free to leave a comment below!).
File Format and Alternative Slicer (PrusaSlicer Adapter)
The format of sliced files sent to the printer is very simple – a set of monochrome PNG files named slice_1.png ~ slice_###.png (yes, numbering starts at 1) and a JSON file called ‘printsettings’ with the exposure/motion parameters, packed up in a .tar.gz file. Of the open-source slicer options, PrusaSlicer is pretty solid, and – importantly – supports both FDM and SLA printers(!) by virtue of Prusa’s own dabbles into SLA printers. The file format of the Prusa SL1 printer is extremely similar to that of the Ember – the actual JSON parameter names and file naming conventions differ a bit, but it’s the same idea, so PrusaSlicer can be coaxed into outputting Ember files with only a little help (some settings changes and a small postprocessing script).
PrusaSlicer Setup:
Obviously, install PrusaSlicer if you haven’t already. Begin by setting up a new “Original Prusa SL1” printer (Printers -> Add/Remove Printer -> Prusa Research SLA -> Original Prusa SL1). Save a copy of the resulting settings preset (enter a descriptive new name, e.g. ‘Ember’, when prompted). Select ‘Expert Mode’ to see all the settings, make the following changes to your new SL1-based preset and save it:
- Bed shape:
- Size: 64 (x), 40 (y)
- Origin: 0, 0
- Max print height: 134mm
- Display
- Width: 64
- Height: 40
- Number of pixels X: 1200, Y: 812
- Display orientation: Landscape
- Mirror horizontally: YES
- Mirror vertically: NO
The remaining settings can be left alone. Right now, PrusaSlicer’s exposure times are ignored and replaced with hardcoded values known to work with the Ember. In theory, the exposure times could be normalized to an engineering unit (J/cm2?) to take advantage of PrusaSlicer’s library of known resins, but I don’t have any to calibrate against, and the one-pager datasheet I could find for a compatible resin didn’t provide any information.
Postprocessing:
For now (quick & dirty), install this Python script and drag your sliced (.zip) outputs from PrusaSlicer onto it (or for you commandline junkies, ‘python prusa2ember.py yourfile.zip’) . This will unpack the original output to a temporary folder, rename the image files, add the correct JSON print settings and repack the output as a .tar.gz file you can send to the Ember printer. For now, printer motion settings are hardcoded by default – you can edit the contents in the script to modify them, or pass a customized version with –settingsfile <yoursettingsfile>.
Basics and Theory of Operation
TL;DR: It’s a fairly simple DLP resin printer with a small build area.
In other words, it builds a printed model by slicing the model into layers, then projecting an image of each layer onto a clear window on the underside of a resin-filled tank using a powerful UV LED. This cures the thin layer of resin closest to the window against a moving build surface, which gradually backs away from the window to allow the next layer to be adhered to the previous, and so on. Kind of simple in concept, and there is something philosophically satisfying about bending liquid plastic to your will by literally showing it pictures of what you want it to be2.
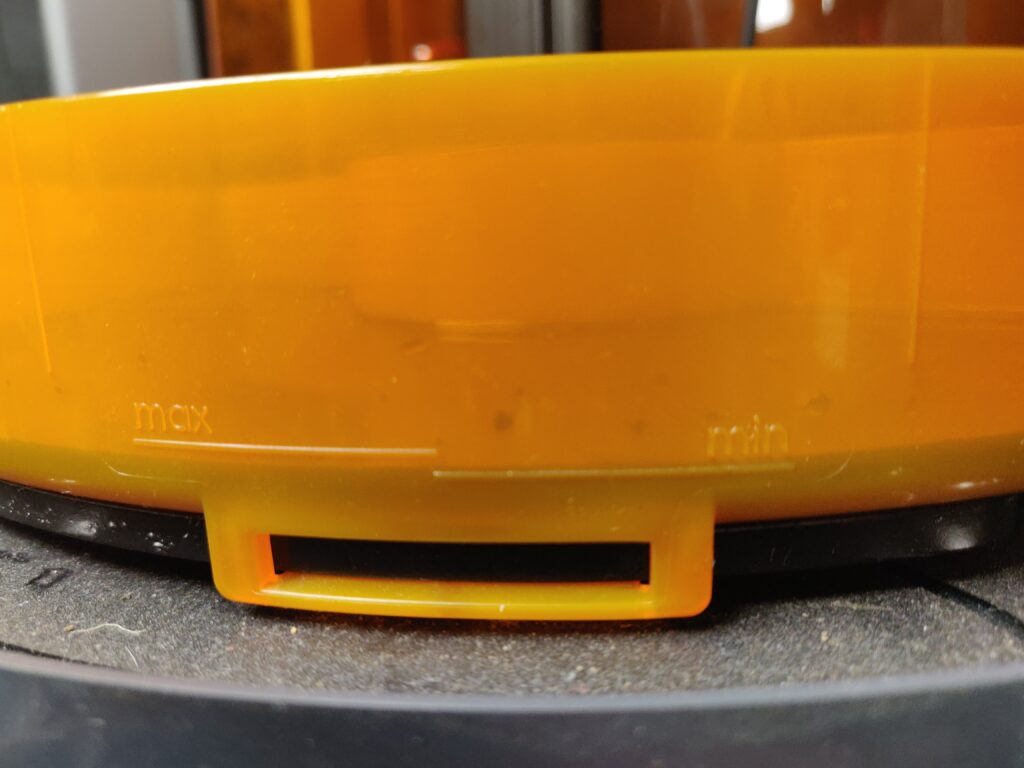
The printer is refreshingly ‘dumb’ (sensorless) and will happily go through the motions even if the resin tank and build head are missing. If you do a ‘dry run’ like this, the theory of operation is pretty self-explanatory. This also lets you check that the mechanicals and LED/projector are functional without much faffing about. Conversely, the minimalist design means there is no temperature control (build volume or resin tank heaters) like on more advanced resin printers, and supplying resin is extremely simplistic: the resin tray has a pair of very closely spaced min/max fill lines, you glug resin out of a bottle until filled to between those lines, and hope it’s enough for a full print (the tiny build volume helps with this) – there’s no mechanism for refilling during printing.
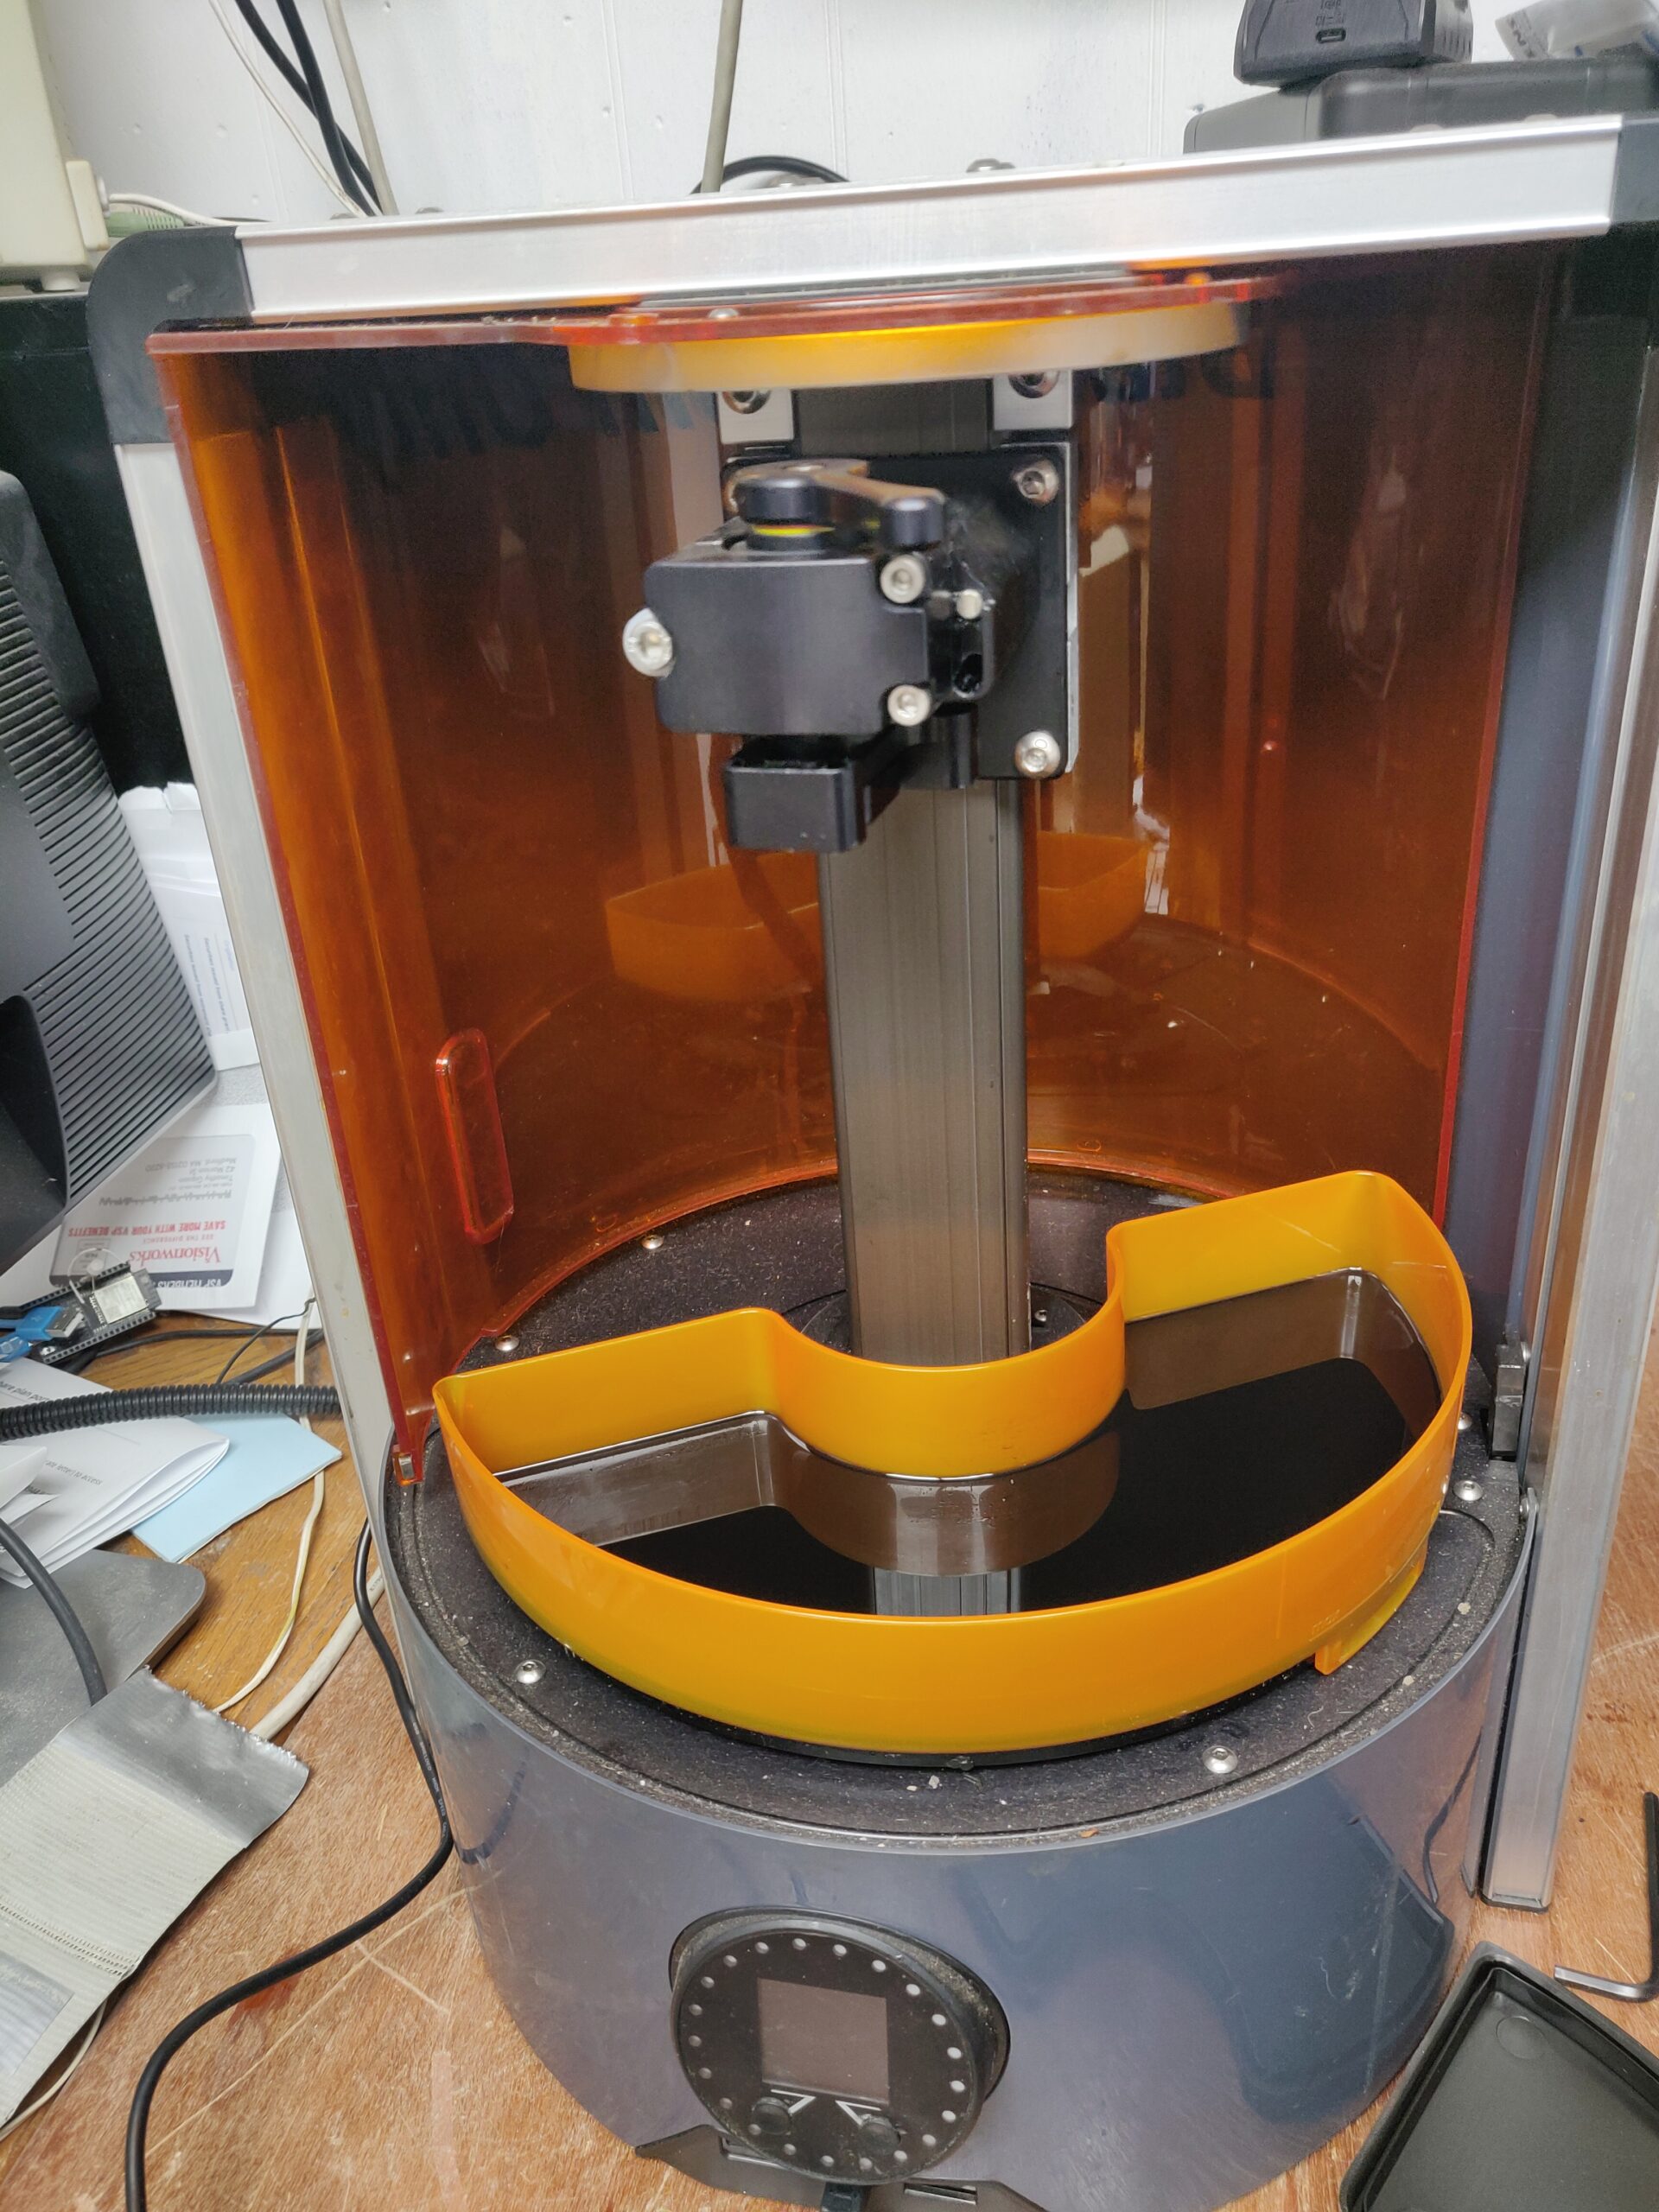
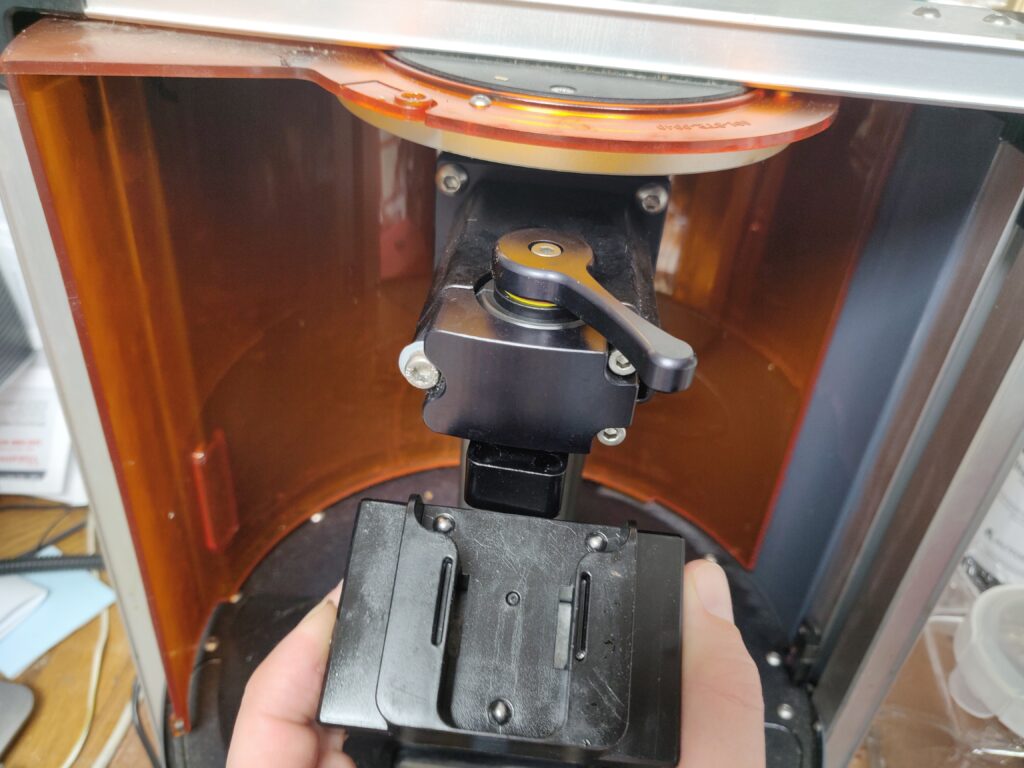
The Autodesk Ember’s removable ‘build heads’ have an outside dimension of ~83x55mm, including some unusable area in the X direction due to exposed (recessed) bolt heads on the build surface. Like many resin printers, the build surface is on the ‘ceiling’ and is gradually lifted out of the resin tank as successive layers of the model are printed, upside-down.
As usual, there is a little extra ‘dancing’ involved in keeping the model from sticking to the projection window and pulling fresh resin underneath. On the Ember, the resin tank has a semicircular shape and the whole tank is rotated back-and-forth ~60 degrees between layers, so that the print is slid off the window after each layer (the head remains stationary), then raised well away, repositioned over the window and lowered to 1 layer higher than before. More info about the window and this ‘dance’ below.
The replaceable build heads are magnetic and snap into a kinematic coupling, and a hand-activated lever fully locks them into place on the build arm. The full head assembly includes a ball joint and sliding cylinder that are clamped into the build arm. Since it’s important that the build surface be completely flat and flush against the window in the resin tank, a simple calibration step (optional at the start of each print) moves the head all the way down and the user is prompted to loosen a “calibration” hex bolt on the head to loosen the head, allowing it to drop down flat on the window by gravity, before retightening the bolt to re-clamp. Simple but effective. A very cute feature is that the build arm has a designed-in magnetic pocket for the needed hex key (Allen wrench) so it stores right where it’s needed and shouldn’t get lost. (Famous last words of course.)
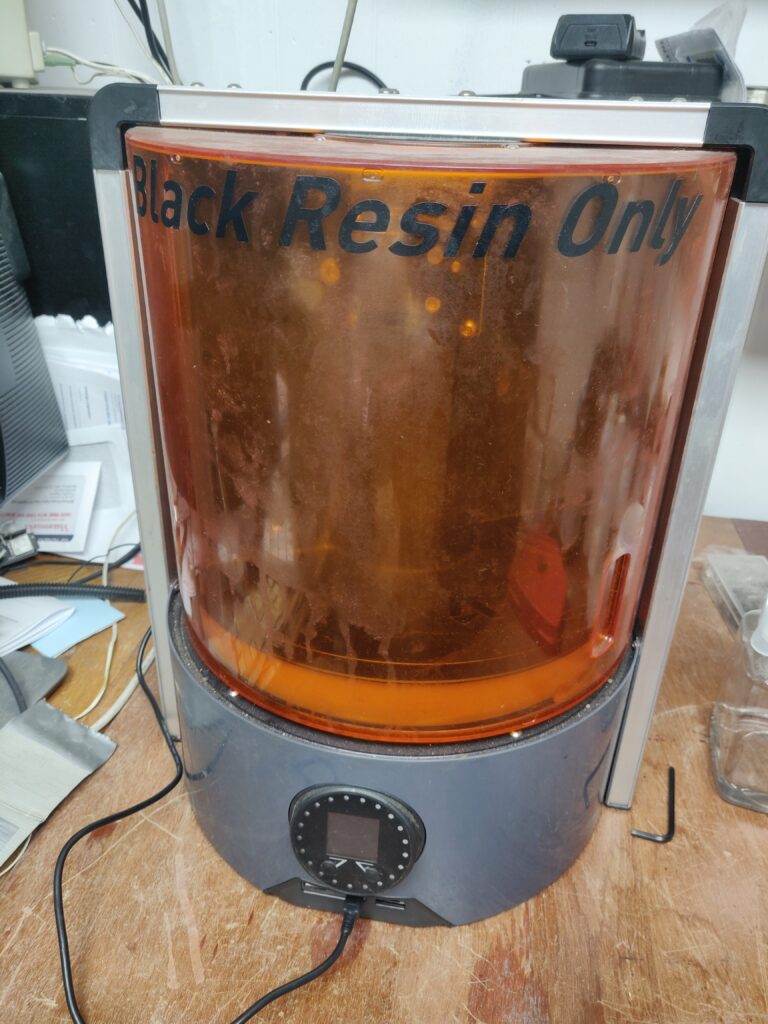
Some Photos

Front Panel Options
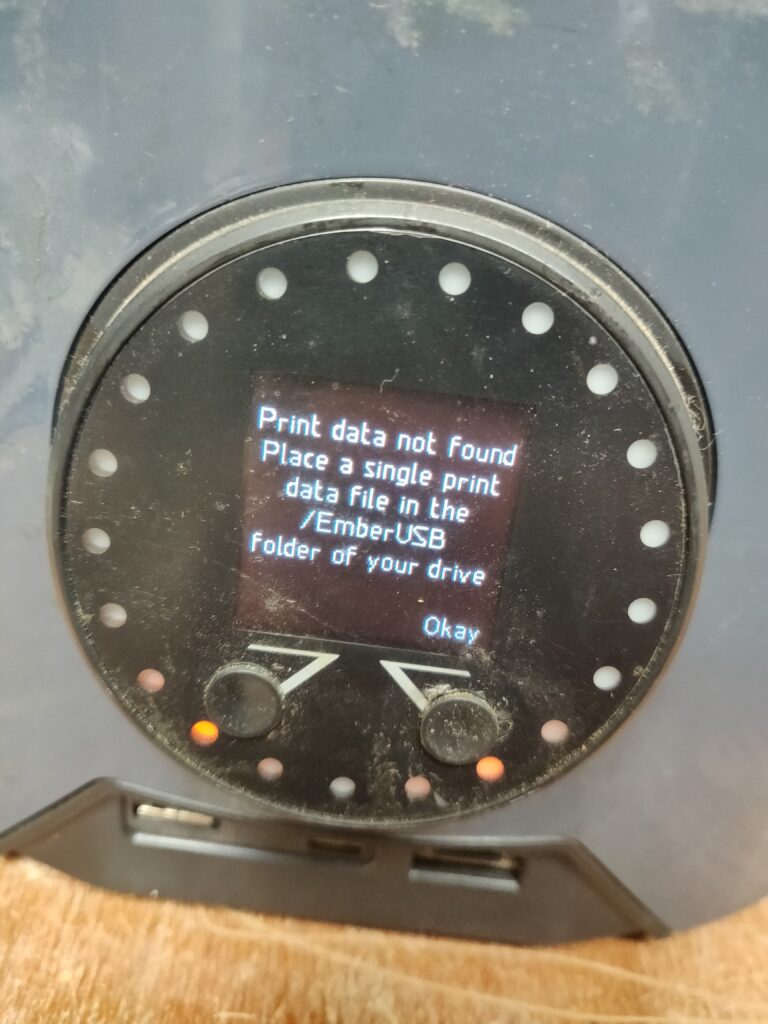
The front panel has a small color LCD with two unlabeled buttons beneath it, surrounded by a ring of animating amber (natch!) LEDs.
Beneath this is a USB-A (host) port, a USB Mini-B (device) port, and a MicroSD slot. On plugging a uSD card in, it is immediately read and, if a recognized printable file is found, you are prompted to print it. On my unit, if a uSD card is present at poweron, it displays the boot animation (rotating LEDs) indefinitely and fails to boot.
Otherwise, the front panel simply prompts you to load a job. I don’t know if it was meant to do more, or if there is a secret keypress combo that exposes more options.
Web and Network Interface(s)
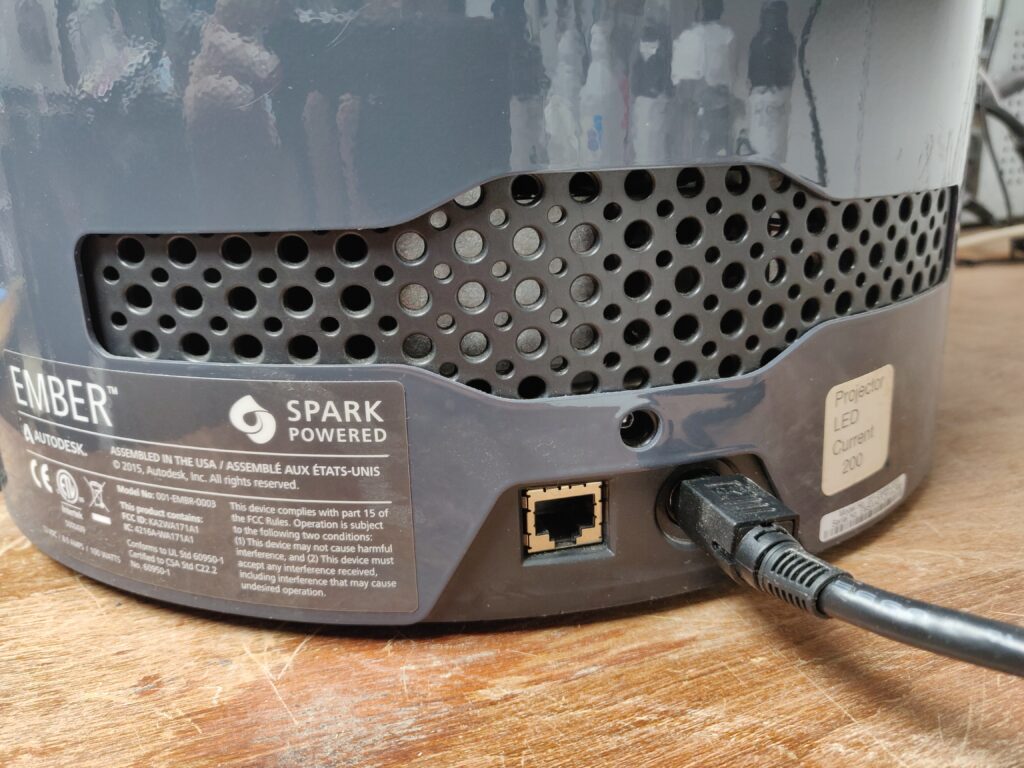
There is a hardwire Ethernet port on the back of the printer. I didn’t see any public mention of Wifi, but mine is appearing as a hotspot named ‘Ember_Wifi_R5PD7A’ as long as the Ethernet cable is not plugged in (the hotspot also disappears once connected to a Wifi network).
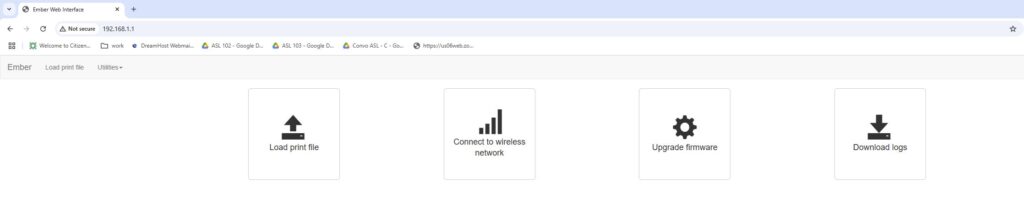
When connected to the hotspot, hitting 192.168.1.1 returns a Web page with a few options, including a way to submit a print job. If nothing appears there, try 192.168.7.2 (reported as the default IP by other sources; may be interface-specific). If you can’t find its IP, try hitting the hostname ’ember’ (didn’t work for me, something something Avahi). You can also connect to a Wifi access point here, just beware you may need to do some fiddling to assign it a known IP address on your access point (or discover the one DHCP gave it).
The printer runs Linux (Debian Jessie, according to ‘hostnamectl’) and can be logged into via SSH once you find out its IP address: username ‘root’, no password.
Not a ton to do there, but you could start by making a backup of the filesystem. install a >4GB uSD, then:
dd if=/dev/mmcblk0 of=/mnt/usb/mmcblk0
The other thing you can try to do is tinker with some advanced settings. The actual print controller internally is called ‘smith’, and has a configuration file at:
/var/smith/config/settings
Oddly, this file is both ‘configuration’ and ‘state’, and appears to get rewritten every time you do a print. For example, the name of the last job is a parameter in this file. If you just acquired one secondhand from a 3-letter agency, look in /var/smith/print_data/print for a copy of the last job run. Luckily, it appears only the immediate last print is accessible via normal means.
Adjusting ‘Smith’ printer settings
Dummy instructions to tinker with the printer engine (Smith) settings:
ssh into the printer (try 192.168.1.1 on hotspot interface, or 192.168.7.2 on USB adapter if you get that to work). Username ‘root’, blank password.
cd /var/smith/config
nano settings

(make desired changes and save)

Reportedly, another special command is needed to make the changes take effect (force 'smith' to re-read the settings file?):

echo refresh > /tmp/CommandPipe

There are some global settings and motion parameters there, as well as settings to calibrate the LED output and a few safeties related to temperature and motor jam detection/recovery (print too-stuck to the surface?).

Apart from global settings, the motion parameters are loosely grouped into 3 print phases: "First" layer (just as described), "Burn-in" (a few initial layers after the first, ~4), and "Model" (the rest of the print). Some of these can be overridden by the slicer on a per-print basis via the settings embedded in the print file.

A potentially important setting is the "ProjectorLEDCurrent", which can be adjusted within reason to calibrate the light output to the design value of 20 mW/cm^2. On my printer, this value is set to "200" (units unknown, but this is a plausible LED current in mA). The author of a speed-hack Instructables article (see below) recommends to "measure the irradiance output of Ember with a fresh clean resin tray (I recommend using a G&R UV Light Meter Model 220 with a 420nm probe or an ILT 1400 with SLE005/U detector)". Assuming you don't happen to have a professional irradiance meter in your junk drawer, I guess you can trial-and-error this (or just tweak the layer cure times).
Network Oddities
Plugging a USB cable from the Mini-B port into a PC recognizes it as a USB serial port. According to a random Instructables user who identified as an Autodesk contractor, this port may be meant to appear as a USB network adapter, exposing a ‘Load Print File’ Web page at an oddly-specific USB address (192.168.7.2) and possibly letting you SSH into the printer. For me, it’s a plain serial port and doesn’t appear to do anything (no diagnostic output or TTY-like behavior).
Contrary to some online resources, mine appears at 192.168.1.1 (on Wifi hotspot interface). Attempting to ping other IPs on the device returns a “Destination host unreachable”.
From the Web interface, there is an option to download system logs. On my unit, these are filled with error messages as the printer is constantly trying and failing to phone home to “emberprinter.com” (long since defunct) with a unique credential. Luckily, nobody has scooped up the domain and tried to send something naughty back to any printers still trying to access it.
Tricks and Hacks
Faster Printing
See How To Configure Ember for High-Speed 3D Printing. In case the link rots, the gist is the author claims up to 24x speedup is possible by speeding up and taking shortcuts in the layer-change motions (sliding/peeling the current layer off the build surface and repositioning the head). The author presents this trick in conjunction with a special speed-optimized resin formula3, so YMMV with stock or random 3rd-party resins (you may get away with tweaking the motion parameters but leaving the exposure settings alone).
Beyond tweaked resin, the hack comes in two parts: Tweaking a couple settings on the printer, and tweaking “slicer” settings that would get pushed to the printer.
Printer settings:
- “ImageScaleFactor” : 1.0,
- “DetectJams” : 0,
- ProjectorLEDCurrent: adjust to target 20 mW/cm^2 output (if you have access to a suitable meter)
See Adjusting 'smith' Printer Settings above for details.
The slicer settings (the original author assumes Autodesk's slicer, which effectively no longer exists, but the equivalent settings in the printsettings JSON in sliced prints should be self-explanatory).
Burn in Layers
- Number of layers: 10
- Wait (before exposure): 0.5 s
- Exposure time: 3 s
- Separation Slide Velocity: 20 RPM
- Approach Slide Velocity: 20 RPM
Model layer:
- Wait (before exposure): 0 s
- Exposure time: 1.2 s
- Z-axis overlift: 0.25 mm
- Separation Z-axis Velocity: 5 mm/s
- Angle of rotation: 0 degrees
A word of caution from me, the ‘sliding’ motion to move the print off the build window before lifting is important, so don’t goose it too much or omit it entirely (see theory below). For the same reasons, the pre-exposure delay can be important, and these should really be chosen on a per-layer basis from the actual print geometry (e.g. this layer’s contact area, among others), but you don’t have that level of granularity with the stock Ember firmware. There may be options for per-layer settings if you upgrade the firmware, I have not looked into this yet (search for ‘layersettings.csv’).
Sub-Pixel Printing!
Following the release of this printer, some press releases and videos appeared about this “One Weird Trick” to achieve sub-pixel resolution!! in your prints, possibly accompanied by the sound of hoofbeats to the patent office. If you remember this type of printer basically shows monochrome .png pictures at the resin from a projector, and have ever used a paint program before, you can probably figure out the ‘trick’.
OK, it turns out there is slightly more nuance than just hitting each layer image with an antialias filter, but only just. According to this paper:
- The ‘gray’ pixels at antialiased edges get less light of course, but this causes them to cure later than solid-white pixels, moreso than cure incompletely. The result is tiny spheroids or fillets of resin form there between the just-cured pixels and smooth out the jaggies before curing themselves. In the Autodesk video, it is also mentioned that the spheroid size that forms depends on the brightness, so on a convex outer edge it effectively sets the ‘width’ of the outermost subpixel, hugging the neighboring full-bright pixel, proportional to brightness.
- There is a minimum brightness threshold to ‘activate’ the resin; it’s not a linear relationship between brightness and time, so dark gray pixels might not do anything.
Super-Subpixel Printing using Pattern Mode
Possibly not for the faint of heart, and most of the actual steps are lost to the ages, but on some models you can switch the LCD from its default ‘video mode’ into ‘pattern mode’ for sharper pixel output. Something to do with ‘video mode’ antialiasing because the physical DLP mirrors are tilted 45 degrees with respect to the output rectangle. To get the benefit from this, you also tilt your print (images) 45 degrees, with a corresponding loss of build area.
Improving Print Quality over Temperature
As I mentioned earlier, this is a pretty simple, early-gen printer, and lacks some modern conveniences like resin temperature control or per-layer print settings. Thus it is doubly important that you read Jan Mrázek‘s article The Winter is Coming – Brace Yourself –Prepare Your Resin Printer And Prevent Print Failures, especially if you live in a climate where ‘winter’ is a thing. While I personally breathe a sigh of relief that my basement is no longer 50-some degF, winter will come again (unless our AI overlords have something to say about it). TL;DR: warm the resin to ~ room temperature to lower the viscosity and ensure the reaction proceeds at its intended speed (some resins may have more specific temperature requirements). If you can’t, try reducing the ‘peel’ (lift/slide motion) speed and adding settling time between settling into the new layer position and actually starting the cure for that layer. Exposure time may need to be goosed a bit too as temperature drops.
Remember that weird sliding motion the printer does between layers, rather than just lifting the head so new resin can flow under the current layer? The theory as I understand it is the oxygen in the print surface (typically a soft silicone-like material like PDMS or FEP) inhibits curing, leaving a very thin (~5 microns) uncured layer at the contact surface, and the viscosity of the resin is such that simply lifting a print of any reasonable surface area, at any reasonable speed, would create untenable amounts of suction force as resin tried unsuccessfully to flow into such a thin gap. On Ember the build plate window sits just slightly taller than the rest of the resin tray, so sliding the print off the window before lifting leaves enough additional gap beneath to mitigate the issue. Likewise, Jan points out the same issue can occur when lowering the head for the next layer, especially with extra-viscous, cold resin: it needs time to squeeze out of the way, in the form of a delay between lowering the head and start of exposure. Otherwise, resin is still squeezing out as it’s being exposed, leading to blobs and warts of cured material (blooming) along the outer surfaces of the print.
Documents and Resources
Online Sources (as of today):
Most of what remains online is on Instructables; I think Autodesk (besides owning it now) had a promotional deal that sponsored or otherwise encouraged Ember-based content when it was new. Yes, the irony of providing an Autodesk-owned weblink dump after a rant about links rotting is not lost on me, but copyright schmopyright. (They will probably be on Internet Archive at least.)
- GitHub page with firmware and other resources (largely web app stuff), scrubbed from Autodesk’s GitHub
- Instructables by Shalomo:
- https://www.instructables.com/member/shalomo/instructables/ – Several intro tutorials on the Ember printer including build head & resin tray installation (some now out-of-date due to disappearing server backends)
- Instructables by Greener1:
- https://www.instructables.com/Ember-Printer-Using-Pattern-Mode-for-Finer-Details/
- https://www.instructables.com/Ember-Printer-How-a-Voxel-Grows/
- https://www.instructables.com/Ember-Printer-Bar-Codes-for-Small-Parts/
- https://www.instructables.com/Vertical-Cross-Section-through-Ember-Slices/ On generating your own raw image slices for printing
- https://www.instructables.com/Ember-Printer-Enhancing-Horizontal-Resolution/
- https://www.instructables.com/Ember-Printer-Measuring-Horizontal-Resolution/
- Instructables by MaddyMaxey:
- https://www.instructables.com/Ember-Printer-Achieving-Layered-Geometries-with-Pn/ – Includes working Ember print file example
- https://www.instructables.com/Ember-Printer-Swatchbook-Textures-and-Finishing/ Lots of experimentation with texturing, dyeing, coating, internal watermarks (etc.) prints, with printable example files
- Instructables by bad-zima
- https://www.instructables.com/Measuring-the-Light-Intensity-of-the-Ember-Printer/
- https://www.instructables.com/How-to-Correct-the-Projector-Uniformity-of-the-Emb/
- https://www.instructables.com/Adjusting-for-changes-in-light-intensity-with-the-/
- https://www.instructables.com/Window-clouding-in-the-Ember-printer/
- https://www.instructables.com/Setting-Ember-for-More-POWER-or-how-to-control-the/
- https://www.instructables.com/How-to-tune-Embers-print-settings-for-new-resins/
- Instructables by cappiep:
- https://www.instructables.com/member/cappiep/ – Lots of resources on disassembly and modding of the printer for performance
- Instructable by ZiyiM:
Backups / Rescues:
- ember-firmware-master.zip Local backup of the unofficial Ember firmware repo above
- Autodesk_Standard_Clear_PR48_Formulation.pdf Open-source resin recipe
- Autodesk-Ember.pdf Sales flyer
- Ember-Specs.pdf
- PR48-TDS.pdf Data sheet (single page) for PR48 clear resin
- And no, the links that now point behind a registration-wall are useless too. If you do cave to the regwall and sign up for an account, you are treated to a 30-day trial of “Autodesk360” / Fusion, presumably tied to the domain of the email address you entered, and any ‘public’ links from long ago just redirect back to your own empty trial account. ↩︎
- “And our coach don’t… want no sissies / So he reads to us from something called Ulysses” ↩︎
- First, we need to prepare a variation on our PR48 resin that will cure quicker and to a deeper depth. We call this resin PR48-High-Speed and the formulation is listed below.
* Oligomer: Allnex Ebecryl 8210 39.8238%, Sartomer SR 494 39.8238%
* Photoinitiator: Esstech TPO+ (2,4,6-Trimethylbenzoyl-diphenylphosphineoxide) 0.4005%
* Reactive diluent: Rahn Genomer 1122 19.9119%
* UV blocker: Mayzo OB+ (2,2’-(2,5-thiophenediyl)bis(5-tertbutylbenzoxazole)) 0.0400%
The UV blocker concentration in PR48-High-Speed has been reduced by a factor of 4 compared to PR48 to allow it to cure quicker and to a deeper depth. ↩︎
Leave a Reply