My son and I have gotten into rock tumbling a bit, so I put a small vibratory tumbler on my “would be nice” holiday wishlist. So, apparently this hobby has gotten popular lately and these things can’t be had for love or money. Maybe for lots of money, but I wasn’t ready to drop 400 bucks just to kick the tires on a goof-off hobby item.
Inspired by this video [youtube] by Wicked Pebbles (Homemade Lot-O Tumbler), I decided to have a go at homebrewing an even simpler one. Total spend about $90, using parts mostly on hand. Besides the satisfaction of being a cheapass DIY, the build shown below works a treat – possibly more performant than commercial versions, definitely quieter, and head-slappingly simple.


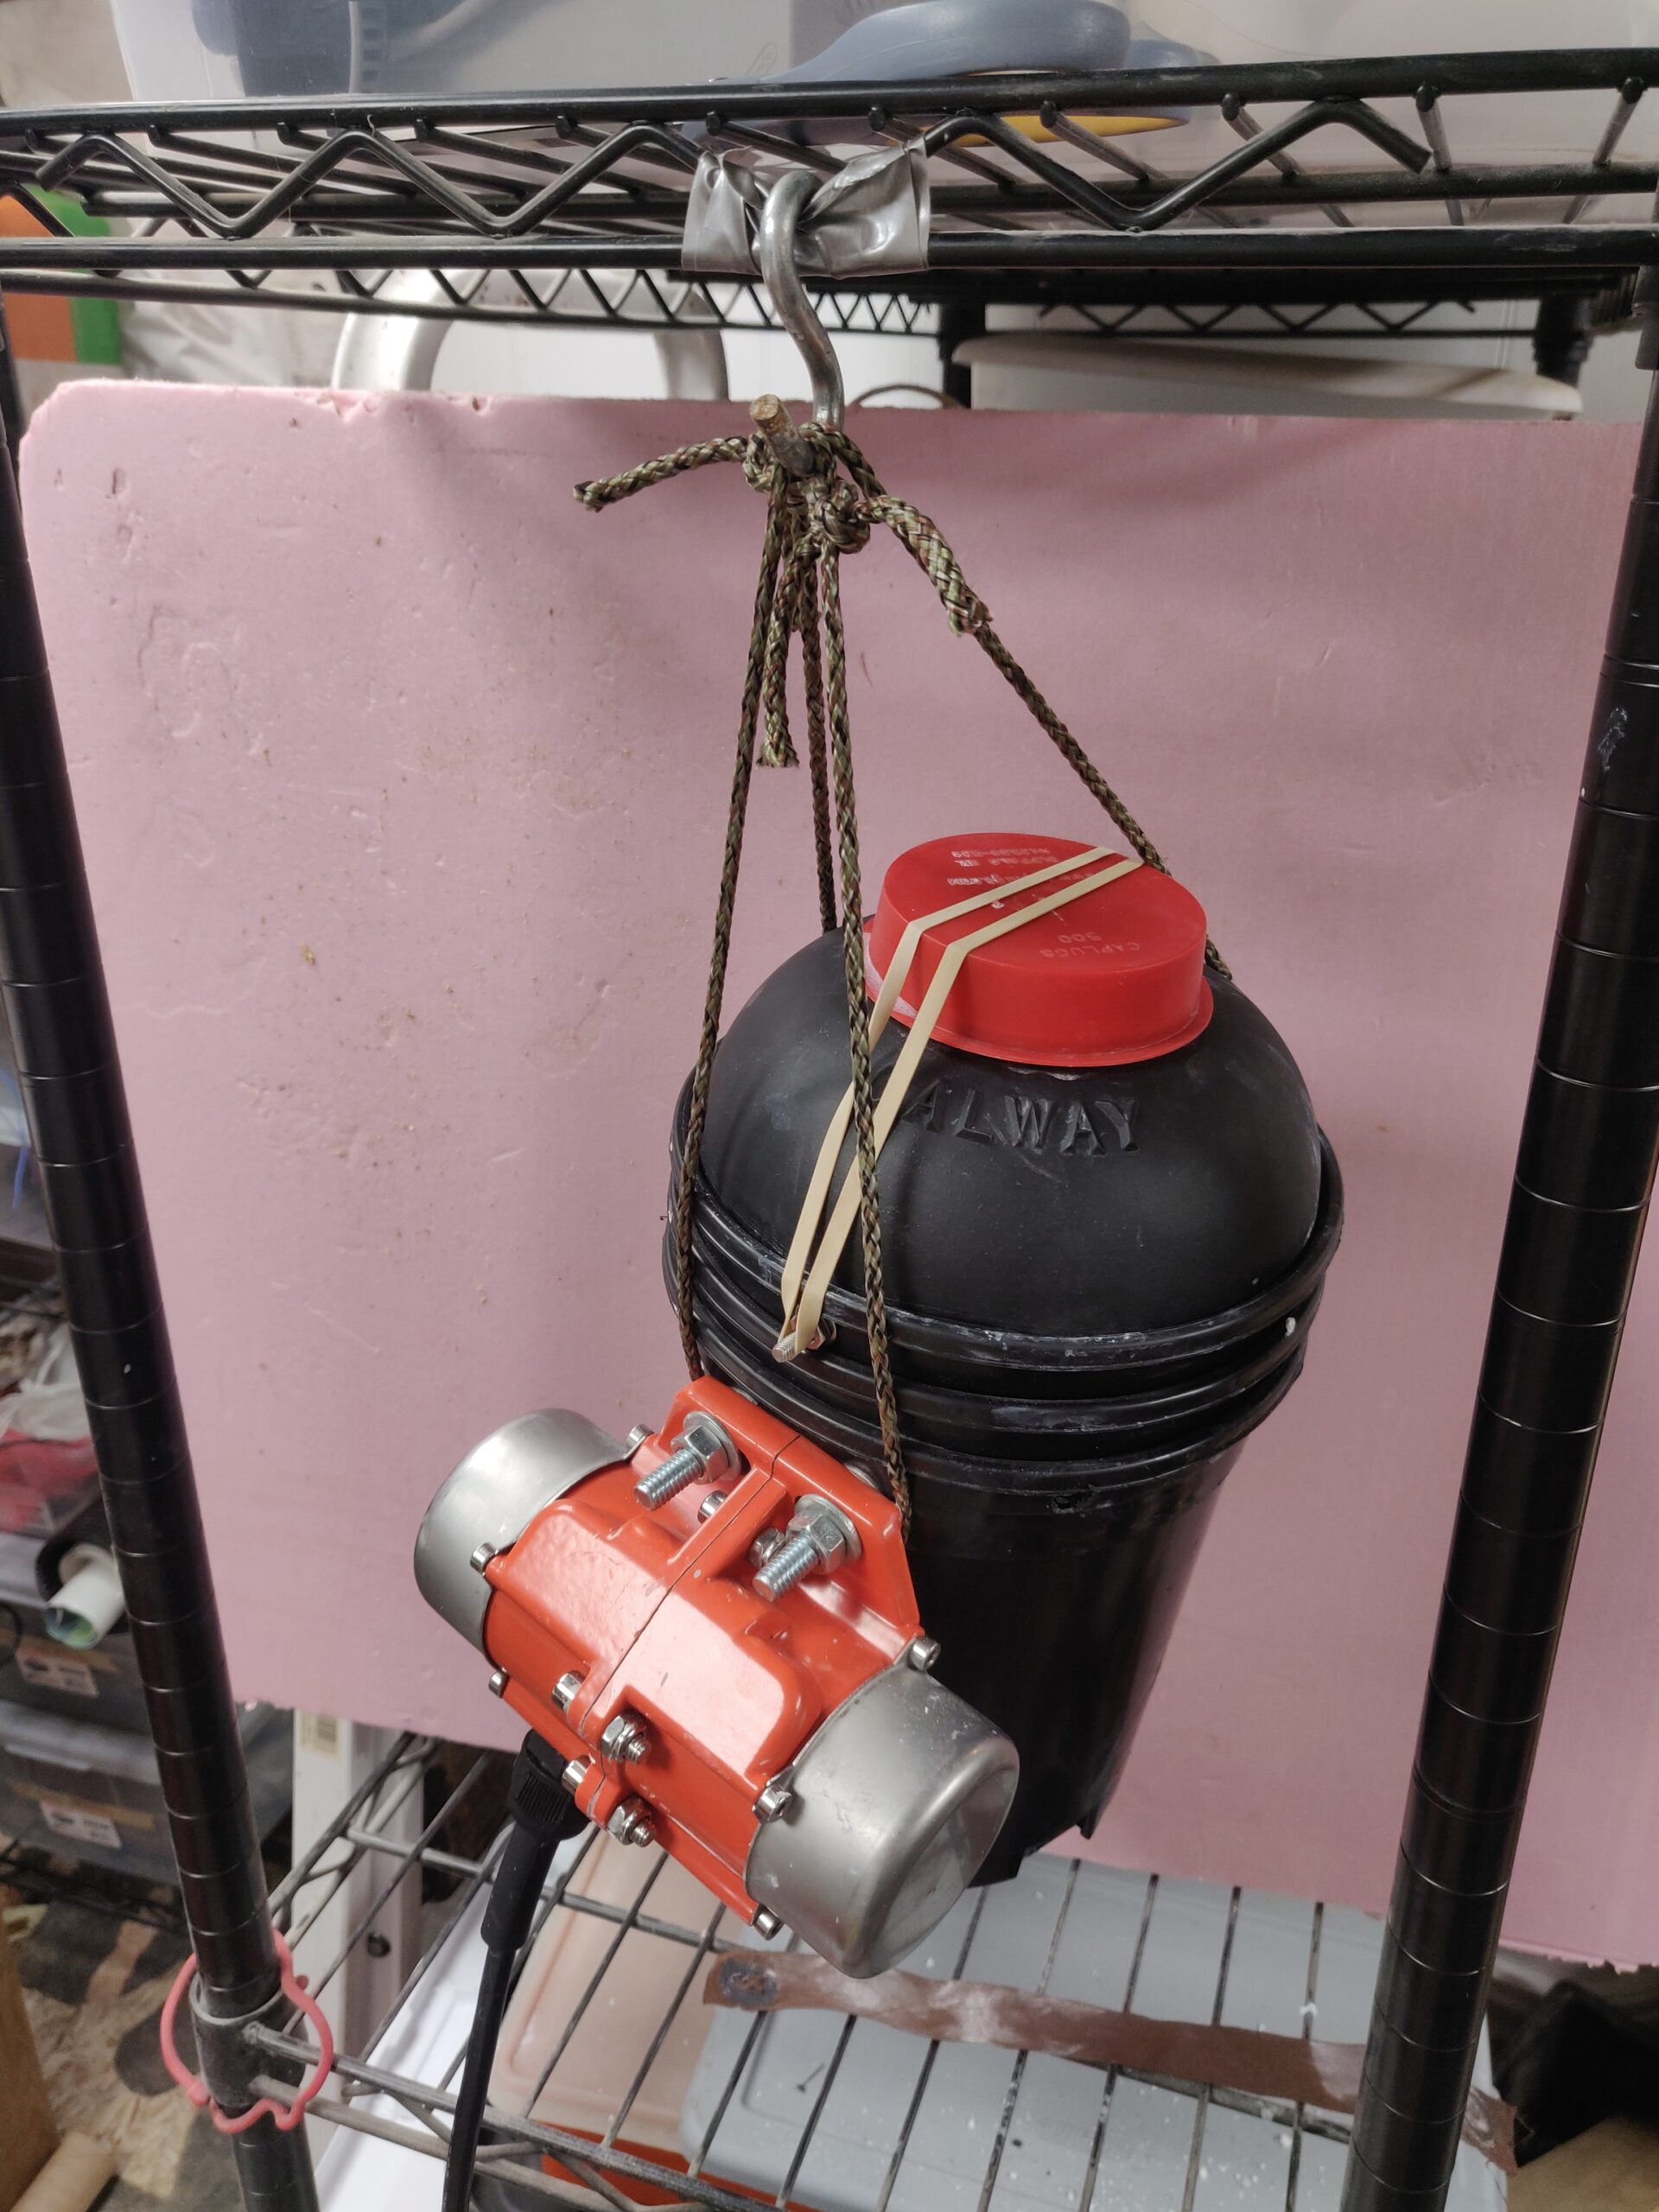
Specialty Supplies
- Calway Lot-O Tumbler Replacement Barrel (~$50). I got mine from Arrowhead Lapidary Supply, but you may need to search around. (That said, these are basically acorn-shaped rubber buckets themselves and there is no magic to them, so any other container you don’t mind sacrificing is worth a try!)
- Vibrating Motor (40W Concrete Vibrator) (~$40). Fairly generic and available from any of the usual overseas sources, including that big river of same. Mine is branded PUTEC / PUTIAN, “Industrial Concrete Vibrator AC Single Phase 110V 3600RPM 40W For Vibrating Table Feeder”. A lower wattage if available would probably be fine, see notes below.
Generic Supplies
- Pot or Bucket, ~6″ inner diameter to snugly hold the barrel. For this first test I am using some flimsy plastic plant pots, which are probably not a long-term solution but are holding up for now.
- Wall plug or power cable (if not supplied by your motor)
- Rope
- S-Hook
- Nuts & Bolts
- Rubber Band (to secure the lid)
Build notes
The actual design is basically “make the motor shake the bucket”, which is not exactly rocket surgery and leaves plenty of room for improvisation. Replicating a similar build is probably self-explanatory from the photo above, but here are a few notes on mine:
Overall Construction:
- With the possible exception of the motor bolt pattern, every measurement here is extremely non-critical and you can basically wing it. Measurements can be eyeballed.
- Fit the barrel into the bucket to confirm it will fit snugly (use some padding to take up a bit of slack if needed) and choose a location for the motor bolts that won’t interfere much with the fit. Ideally, the barrel will lodge against the bucket at its widest point and have an air gap everywhere else suitable for bolt heads to peek through.
- Drill two small holes at the top of the bucket ~180 degrees apart, and install a small bolt in each with the threaded end sticking out on the outside of the bucket. This provide a place to loop a rubber band over the barrel and lid to hold them down.
- Trace the bolt pattern of the motor onto the bucket, then drill and bolt the two together. You could be nice and bodge up something to take up the gap between the flat motor mount and the round bucket. I just bolted them and let the bucket get pulled slightly out-of-round, with no ill effects.
- Drill 2 holes at roughly 90 degrees apart near the top of the bucket, centered opposite the motor. Again, exact placement is not critical, but they should be well above the center of mass.
- Cut two pieces of rope with adequate slack. Thread one piece through the holes you just made, and thread the other through the gap beneath the motor mount, just below the topmost bolts.
- Hang the S-hook somewhere convenient, loop both ropes over it and loosely knot, adjusting the length of each loop so that the barrel hangs straight. Once satisfied, double/triple knot them and optionally add a dab of superglue so that hours and hours of vibration won’t work them loose.
…And done!
Follow any online tutorial for guidance on grit, water, rocks and filler media. I found these are also either not as fiddly as folks make it out to be, or else I got lucky.
Here is the result of the maiden voyage of the beautiful tumbler seen above. I tested it with some beach pebbles we picked up on vacation in Cape May, NJ, near the infamous Jersey Shore. While not quite the famous Cape May diamonds, they are mostly quartz and, ignoring the occasional crack that we decided just to be OK with, were already smooth enough to skip the rough grit stage. They spent about 12 hours in each of the other stages (220, 500, 1200 grit) with 10-minute bonus runs of just soapy water to help get any remaining grit off the rocks and barrel between stages. I did take a toothbrush to a few that were visibly holding grit in a small crack.


Motion and noise:
The main complaint people seem to have about vibratory tumblers, apart from cost, is the noise. I have read about people turning them off at night so they can sleep.
I currently have the homemade tumbler hanging from a freestanding wire baker’s rack style shelving unit in my basement. Most of the noise seems to come from inside the barrel, and is much louder with the cap off. While I wouldn’t call it quiet while sitting right next to it, the material on the shelves doesn’t rattle & hum, and the sound doesn’t carry into other rooms. In fact, sitting directly above it on the living room couch, you can’t tell it’s running.
Really, I suspect the silly rope-mount actually improves over the commercial offerings in a couple ways. Firstly, there’s almost nothing to it beyond the motor & barrel; mass-wise, there’s no ‘there’ there. The motor vibration drives the load and pretty much nothing else.
Second, the vibration is provided by rotating eccentric (imbalanced) weights, and so the “vibration” is not really a back-and-forth shake but a small circular motion in two axes. Suspending the side-mounted motor as shown converts the vertical component – which would otherwise be transmitted through you floor – to more of a rocking motion that can be taken up by pivoting of the s-hook before it reaches a fixed structure, while preserving the vibration and ‘flow’ that keeps the material inside mixing for an even polish. You can see the rocking more clearly in slow-motion in the video above. You can also see a bit of deformation in mine, likely due to the thin plastic plant pots used structurally, but it doesn’t seem to be causing wear to the barrel or otherwise hurting anything.
The exact rotational center of the contraption will vary depending on exactly where the motor is attached and what it weighs vs. the variable load in the barrel, but is not critical – there is plenty of motion to go around. The net vibration at the far end of the S-hook will not be zero of course, but together with the damping provided by the rope it should be much more tolerable.
The professionally made units use the same style of motor. To be fair I’ve only seen them in pictures, but on the Lot-O (Calway) design it looks like the barrel mounts to some thin springy rails to -maybe- constrain the direction of motion, and the instructions call for bolting the entire thing down to a cinderblock to keep it from rattling and walking around. In other words it is pretty significantly using this mount (and ultimately the floor it sits on) as a counterpoise by design, and transferring vibrations through it. Reviews I’ve seen suggest placing various damping objects like foam pads or blankets under the cinderblock to cut down the noise. Other vibratory tumbler designs suspend the barrel on several large springs to similar effect. For a little wasted vertical space and some rope, we get to sidestep this part entirely.
Performance, efficiency, etc:
In short, don’t worry about it too much. As with the Wicked Pebbles build linked above, I found that the motor shipped with “full beans” configuration, which was way too many beans, and ended up adjusting the weights to more-or-less their minimum configuration.
From what I’ve read, getting good results from a vibratory tumbler is a balancing act of getting enough motion to rapidly rub grit against all surfaces of the rocks, and keep them moving around enough to wear evenly, but without so much that they chatter together and chip one another. Some enthusiasts refer to this as ‘bruising’, and it can be seen especially along the narrower edges of stones when they have spent some time whacking into each other rather than rubbing. So perfectly transferring all the available vibration is not critical, and toning it down from excess may prove the bigger challenge.
Vibrating Motor Details:
These units appear to be fairly common, featuring an AC motor with a pair of eccentric weights on either side under a protective shield (hopefully), and a flat mounting face with a bolt pattern. These are sold as concrete vibrators, or for vibrating massage chairs, etc. Mine is about 6 inches edge-to-edge, plugs into the wall (120VAC) and claims to be 40W. Obviously, doublecheck and choose the appropriate voltage for your region. The bolt pattern on mine is rectangular and approximately 1.5″ x 3.5″; a 5/16″ bolt fit nicely. This may vary between products of course.
Before purchase, confirm if yours includes a wall cord and plug, and source these if needed. For mine, the cord was included but ended in bare wires. Plug ends should be available at any decent hardware store (may be sold as “repair” or “replacement” plugs) and open up to reveal screw terminals to attach the wires. For North American plugs, “hot” (black) goes to the skinny blade, “neutral” (white) to the fatter blade, and earth ground (green) to the round one – don’t skip this one!
The eccentric weights are normally adjustable. The motor “should” come with instructions for this, but in general, they consist of two or more half-moon shaped metal discs stacked on each other. To adjust them, unbolt the covers on either side, remove the bolt that holds the weights on (this may take some elbow grease), “clock” the outer one(s) to a new position relative to the inner one and tighten everything back down. Typically, the inner and outer weight on either side have matching indentations so they lock together at a handful of discrete orientations and won’t slip over time. Maximum vibration occurs when the weights are most off-balance (semicircles are fully atop one another) and ~zero vibration if the outer weight is spun 180 degrees around to form a complete, balanced circle. If there are more than 2 weights on either side, you have a little more choice, but the idea is the same. Just be sure to set them identically on both sides, so that the vibration axis is ‘balanced’ across the motor shaft and not torqueing the shaft or bearings. For my 40W motor, there were 4 weight sections on each side, but only the outer 2 were movable (both inner ones had a D-shaped hole matching a flat in the shaft and could not rotate). I moved the outer two to the minimum possible position where at least one indentation overlapped, and it still seems borderline excessive. If smaller motors exist, say 20W, it would probably be enough.
Barrel:
Again, I’m using an official Lot-O Tumbler replacement barrel. There’s no magic to them, it’s just a hard rubber acorn-shaped cup, but they do come with a nice tight(ish) fitting lid. If you find these impossible to source, it’s worth trying something else. Can you 3D-print something and coat it in Plasti-Dip? Make a mold of an acorn squash? Can you just use a disposable yogurt tub or plastic milk bottle and replace it after every run? Is the acorn shape or the rubber bump on the bottom ‘special’ to making the material flow? Don’t know, but if you try it, let me know the results!
Leave a Reply