Palram Mythos Greenhouse Hacks / Improvements

Posted

by

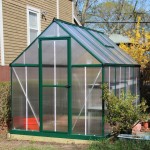
Palram Mythos 6x8 Greenhouse. Pretty nice overall, but could use a bit of shoring-up for longevity.
Palram Mythos 6×8 Greenhouse. Pretty nice overall, but could use a bit of shoring-up for longevity.

My brother-in-law and I put this together over a long afternoon. Much of that time was spent building and leveling a 4×4 frame – the actual construction went pretty smoothly.

On the other hand…

It stayed intact for about 24 hours. The very next day, a typical springtime storm rolled through with a bit of wind (the weather report claimed 30mph gusts). When I got home from work, the door side of the greenhouse was crumpled in, some of the horizontal supports bent backwards on themselves and a few twinwall panels were blowing around the yard.

The window panels are standard-ish, 4mm polycarbonate twinwall (mostly 2ft x 4ft? sections) and can be sourced easily online, but the metal structural parts are custom and replacement parts can’t be bought separately – so wrecking any is a big deal!

Anti-Flex / Anti-Fall-Apart-In-A-Stiff-Wind Fixes
This revealed the main apparent design flaw: Many of the structural components are joined together by nothing more than the friction of a bolt head – not even passed through complete holes in both parts (which would somewhat fix the parts together even if the bolt were to loosen), but often via a U-shaped notch in one or both parts, or with the bolt sliding freely in a t-slot. Major places this appears to be a problem are:

  • where the vertical rails for the walls slot into the base
  • where the upper and lower halves join together at the ends (mainly the upper bolts in the horizontal metal supports about halfway up either end)
  • where the verticals around the door bolt into the horizontal near the ceiling

Add to this the fact that many of these end bolts must be tightened only after installing the twinwall panels, which renders the heads nearly inaccessible, and flimsy cross-bracing (more on that later), and you end up with a major structural problem. Each time a gust of wind hits, the top of the greenhouse can sway back and forth a bit with respect to the base (the diagonal support straps simply flex). Each time this happens is an opportunity for these friction-held bolts to very slightly work themselves apart. Enough cycles of this (a day’s worth, depending on the day) are enough to separate the vertical wall rails from the base, or the bolted notches at the above-indicated spots from one another.

If you live in a breezy location, one of the best favors you can do for yourself is scrap these flimsy diagonal straps on either end in favor of some sturdy aluminum angle or U-channel stock from your nearest hardware store. One catch, I’ve only seen such stock for sale in the US in 4-ft and 8-ft lengths, while the pieces for the greenhouse are 51″. So to do it proper you’d have to get 8ft pieces and have nearly half of each piece as scrap. Not a huge problem if you have other uses for this material, but otherwise it’s annoying. Since the lower bolt each one mates to is in a slot in the greenhouse’s vertical rails and can slide freely, you can maybe cheat and use 4-ft lengths by not having them go all the way to the bottom. Probably still better than the straps it came with.
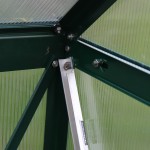
Original diagonal brace (left) and one cut from aluminum U extrusion. Stiffening these prevents wind gusts from rocking the greenhouse back and forth and working the bolts loose.

In addition, I found the following small tweaks very helpful in keeping the thing together:

  • Ditch that silly tube-thing that comes with the greenhouse and is supposed to act as a nut driver. Use a proper nut driver. You just can’t torque them down tight enough with that tube-thing.
  • Wherever those U-shaped notches occur on the endwall pieces, replace the standard nut with a locknut and (on the head side) lockwasher. The square-headed bolts that come with the greenhouse appear to be 1/4″, but with a non-standard thread pitch (non-standard = not what the Home Depot sells). So you may as well replace the bolt too (these end ones don’t require the square heads for anything) – preferably with the widest head you can find. Locknuts tend to have a wide flange around them…and, well, be locking. This should help them get a better grip on those U-shaped notchy bits.
  • Find, buy or fashion some thin tool you can slip between the horizontal supports and the twinwall panels to hold the bolt heads in place while you torque them down. I got extremely lucky and found a thin stamped-metal “crescent wrench” (from some Ikea furniture, I think) lying around that was a perfect fit, that I could slip in and juuust grab the edge of those square-headed bolts. You can probably fashion something using a hacksaw and any thin piece of metal (like one of those useless diagonal straps).

One final comment on this. After it blew apart the first time and things shifted a bit, I discovered the vertical members on either side of the door were now “too short” (or the ceiling assembly “too tall”) for the two to bolt together reliably anymore. On further inspection, the stamped metal base on this side seems to have “sagged”, so when the vertical wall supports were bolted to it, they no longer adequately reached the part it’s supposed to bolt to. Of course, anyone stepping or even brushing their feet against the base on the way in/out will just make this worse. To remedy, I cut some braces out of some aluminum stock I had handy and wedged them under the lip to prop it up at the edges of the doorframe.
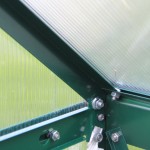
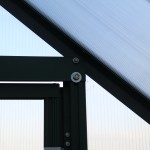
Where important bolts pass through U-shaped notches instead of proper holes, replace the standard bolt and washer to add a lockwasher and flanged lock nut for added grip. Somehow hold the bolt head so you can tighten the everloving shit out of these.
More questionable U-notch attachments, above the door. In addition, you may find (now or in the future) that these verticals near the door have become too short to fully mate with this horizontal support near the ceiling.
To avoid the eventual "too short" problem, wedge something underneath them to prop up the lip of the base and prevent it from sagging over time.
To avoid the eventual “too short” problem, wedge something underneath them to prop up the lip of the base and prevent it from sagging over time.

Spare Parts
After completing assembly, I found I had at least a half-dozen square-headed bolts left over. The instructions make oblique reference to there being spares of some parts, but if I had known I’d have this many, I’d have dropped the extras down the vertical wall supports to provide extra attachment points. This could be handy to double-up the cross-brace straps along the sidewalls (if you followed the very strong recommendation above, you should have 4 spare ones now), or provide a way to hang small tools, etc.

More Windproofing
The doorhandle is pretty loose and can be easily lifted by the wind, letting the door fly open and thrash itself and everything it touches into oblivion. If you bought the accessory plant-hanging hooks (little plastic doohickies that twist-lock into the t-slots along the walls and ceiling), you can insert one on the inside of the door behind the handle, providing a convenient place to hook a spring or rubber band to maintain some downward tension on the handle.

Online reviews for a cheaper greenhouse from another vendor (sounds like ‘Hazard Fraught‘) recommend caulking in the twinwall panels to prevent them being popped out by the wind. I haven’t done this yet, but plan to.
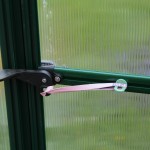
A hanging plant hook (optional accessory) is a convenient place to hook a spring or rubber band to prevent winds from lifting the door latch.

Posted

in

by

Tags:

Comments

9 responses to “Palram Mythos Greenhouse Hacks / Improvements”

  1. Brandon Avatar
    Brandon

    Nice write up… I am trying to add additional bracing to mine and am having a hard time finding any t-slot bolts that fit. What size did you find that you could use? Thanks!

  2. Tim Avatar

    Sorry, no clue. I didn’t find or use any new t-slot bolts, for braces I just drilled holes and slots into plain aluminum stock from the hardware store, and used the bolts that came with the greenhouse. For holes or u-shaped half-holes in the structural parts, doublecheck this, but I think I used #8-32 bolts with fat heads.

  3. m Avatar
    m

    AWESOME commentary and instructions! Am just now in the process of assembling this very same model, and my kit is short one diagonal brace, but after reading your advice I’ll be replacing all the braces with aluminum L-stock.

    Will also be making my own cable-anchoring kit; the prepackaged hardware in the Palram kit looks to be pretty expensive for the contents, and I already have heavy-duty duckbill anchors I’ll be using instead of their twist-in anchors. (which are really only handy for keeping the dog attached to the yard.)

    Do you know of any source for buying replacement Palram parts? Looking all over the internet, but not finding anything. Seeking the hardware that attaches to the top ridge, which the cable passes through when crossing over the top of the greenhouse.

    Thanks again for taking the time to write up your experience and posting the helpful photos!

  4. Cotton Avatar
    Cotton

    I purchased 2 Paltram 8 x 12 Greenhouses.
    I’m still experimenting with the 1st one.
    Two significant notes & modifications:

    There is huge air drafting at the top & bottom edges of the panels.
    To remedy, cut foam Backer Rod to length & stuff into crevice.
    Available at most home improvement stores (in weather stripping section) in various thicknesses.

    Most people will hang plants in greenhouses. Instead of buying individual hangers, I’ve used 3 ft & 6 ft 90′ aluminum angle drilled out & mounted to the panel support beams.
    Not only does it give me room to hang my orchids, but adds strength to the structure by preventing twisting.

    I too, am having difficulty obtaining T, Hammer, or Cropped Bolts. I have been using my Dremmel to cut & grind OTC bolts/ machine screws to work thus far. It looks like I may have to order from UK to get what I need…
    I have heard that rusted steel bolts have destroyed greenhouse dis-assembly & relocation- so be careful.
    I just placed an order from UK for aluminum Cropped Bolts to replace the steel ones & continue hanging aluminum 90′ angle…

  5. One Gust Wonder Avatar
    One Gust Wonder

    One gust took down my 8 x 12 Snap & Grow and flattened it. Many parts salvageable, but the problem is this.

    Almost all of the aluminum extrusions are ok, except for the plastic pieces that come in the ends already assembled. They each have a part number molded in, but after contacting Palram Applications for replacement parts, they tell me I have to order the whole assembly – extrusion plus the plastic pieces, and that they don’t sell the plastic separately. So, what is probably a $2 replacement plastic piece is not sold, and I need to order a $10, $15, or $18 assembly in order to get the plastic. Stupid. I’ll probably have to scrap the whole greenhouse, because it won’t be affordable to obtain the plastic pieces. Does anyone know where to buy the plastic pieces that normally don’t ship loose?

    I bought it used, and didn’t have to assemble it. However, after the “CRASH”, disassembly has revealed the weak areas, and if I can get my hands on some plastic parts, I plan to reinforce many things and build my own cable tiedowns. I’m going to bolt aluminum gussets to the corners of the doors, because the doors sag and go out of square over time.

    Anyone know where to buy the numbered plastic joining pieces that come preassembled to many of the aluminum extrusions?

  6. June Moore Avatar
    June Moore

    I purchased 980V Class 8ZP 6×1 lock nuts to fit the screws and used them on every screw.You can purchase them at Able Fastener, Beaumont,Tx. 409-842-2790. Only $14.00 for 100. I added purchased angle as suggested and the house feels sturdy. Big storm coming on so we will know soon. Thanks for all the tips.

  7. Breck Avatar
    Breck

    The roof vent keeps blowing off any ideas on how to improve the hinges?

    Thanks for you help.

  8. Breck Avatar
    Breck

    The roof vent keeps blowing off my Parlam greenhouse, any ideas on how to improve the hinges?

    Thanks for you help.

  9. Kari A. Olson Avatar
    Kari A. Olson

    Don’t look a gift horse in the mouth. Given 6 x 8 Methos greenhouse. So far taken my brother and I a week + to assemble stupid directions that make no sense. Thank you for your tips which make us feel less like dopes….no such thing as “no maintenance” with this contraption. Parts can be obtained via local hardware, marine boat supplies, greenhouse supply and Amazon. Not bad looking, function will work with extra TLC or #@/$%&×+@$# shi—t! Pelham will enter you in contest if you send them a picture of your project…they didn’t say anything about comments though :-(.

Leave a Reply

Your email address will not be published. Required fields are marked *