Ah, the United States Supreme Court. Wrestling with the country’s thorniest legal questions of bodily autonomy, presidential immunity and whether you can ducttape a banana to a (consenting) wall.
No, seriously, the Supreme Court issued an 80-page ruling1 on whether taping a banana to a wall is copyrightable (TL;DR: it isn’t). Suppose, just suppose, you were an idiot art enthusiast who had just dropped a cool $6.2 million (also known as ‘a bunch’) on the exclusive rights to the not-quite-OG wall banana. How do you protect your investment? If, on the other hand, you’re a slippery pirate who’s into it to the princely sum of 30 cents, how do you C your A?
Before we resolve that split, let’s peel open the juicy mystery of banana copyrightability.
The Case of the Bannable Banana
In the year 2000, one Joe Morford taped a banana and an orange to a wall, and called it art. Specifically, being the creative type, he called it Banana & Orange. Each was centered in a frame, also made of tape, on a green background (reproduced in the PDF above).

In the year 2019, one Maurizio Cattelan plagarized his own earlier work for New York Magazine (“a banana hanging from a billboard with red duct tape”) by taping a banana to a wall, and calling it art (Comedian, in this case). Hilarity lawsuits ensued. Specifically, a copyright lawsuit from Morford asserting the exclusive right to tape bananas to walls and optionally call them art (the courts pointedly avoid the question of “what is art”2, while totally not stifling peals of laughter).
The case is mainly settled by a district court in south Florida (natch), noting that copyright protects expressions, not ideas3 and, with their straightest-of-straight faces on, they apply the well-known Abstraction-Filtration-Comparison test to determine that the idea of taping a banana to a wall is exactly that – an idea – and there are an extremely finite number of ways to express it. After painstaking analysis of the angle of the banana, its stem, and its silvery fixation, these elements were found non-protectible per the merger doctrine. Separately, the district and upstream courts shrug off a separate test for “factual copying”, which would reduce the standards for assessing similarity if it could be proven the defendant actually saw and had opportunity to copy the work (or had a high likelihood of exposure, basically, which gets into slippery territory I won’t try to summarize here, except to say that Morford’s publication of “One bourbon YouTube post, one scotch Facebook post, and one beer Blogspot post” did not meet the standard.) Courts up the chain effectively noped out of hearing, erm, appeals.
Protecting Your Asset
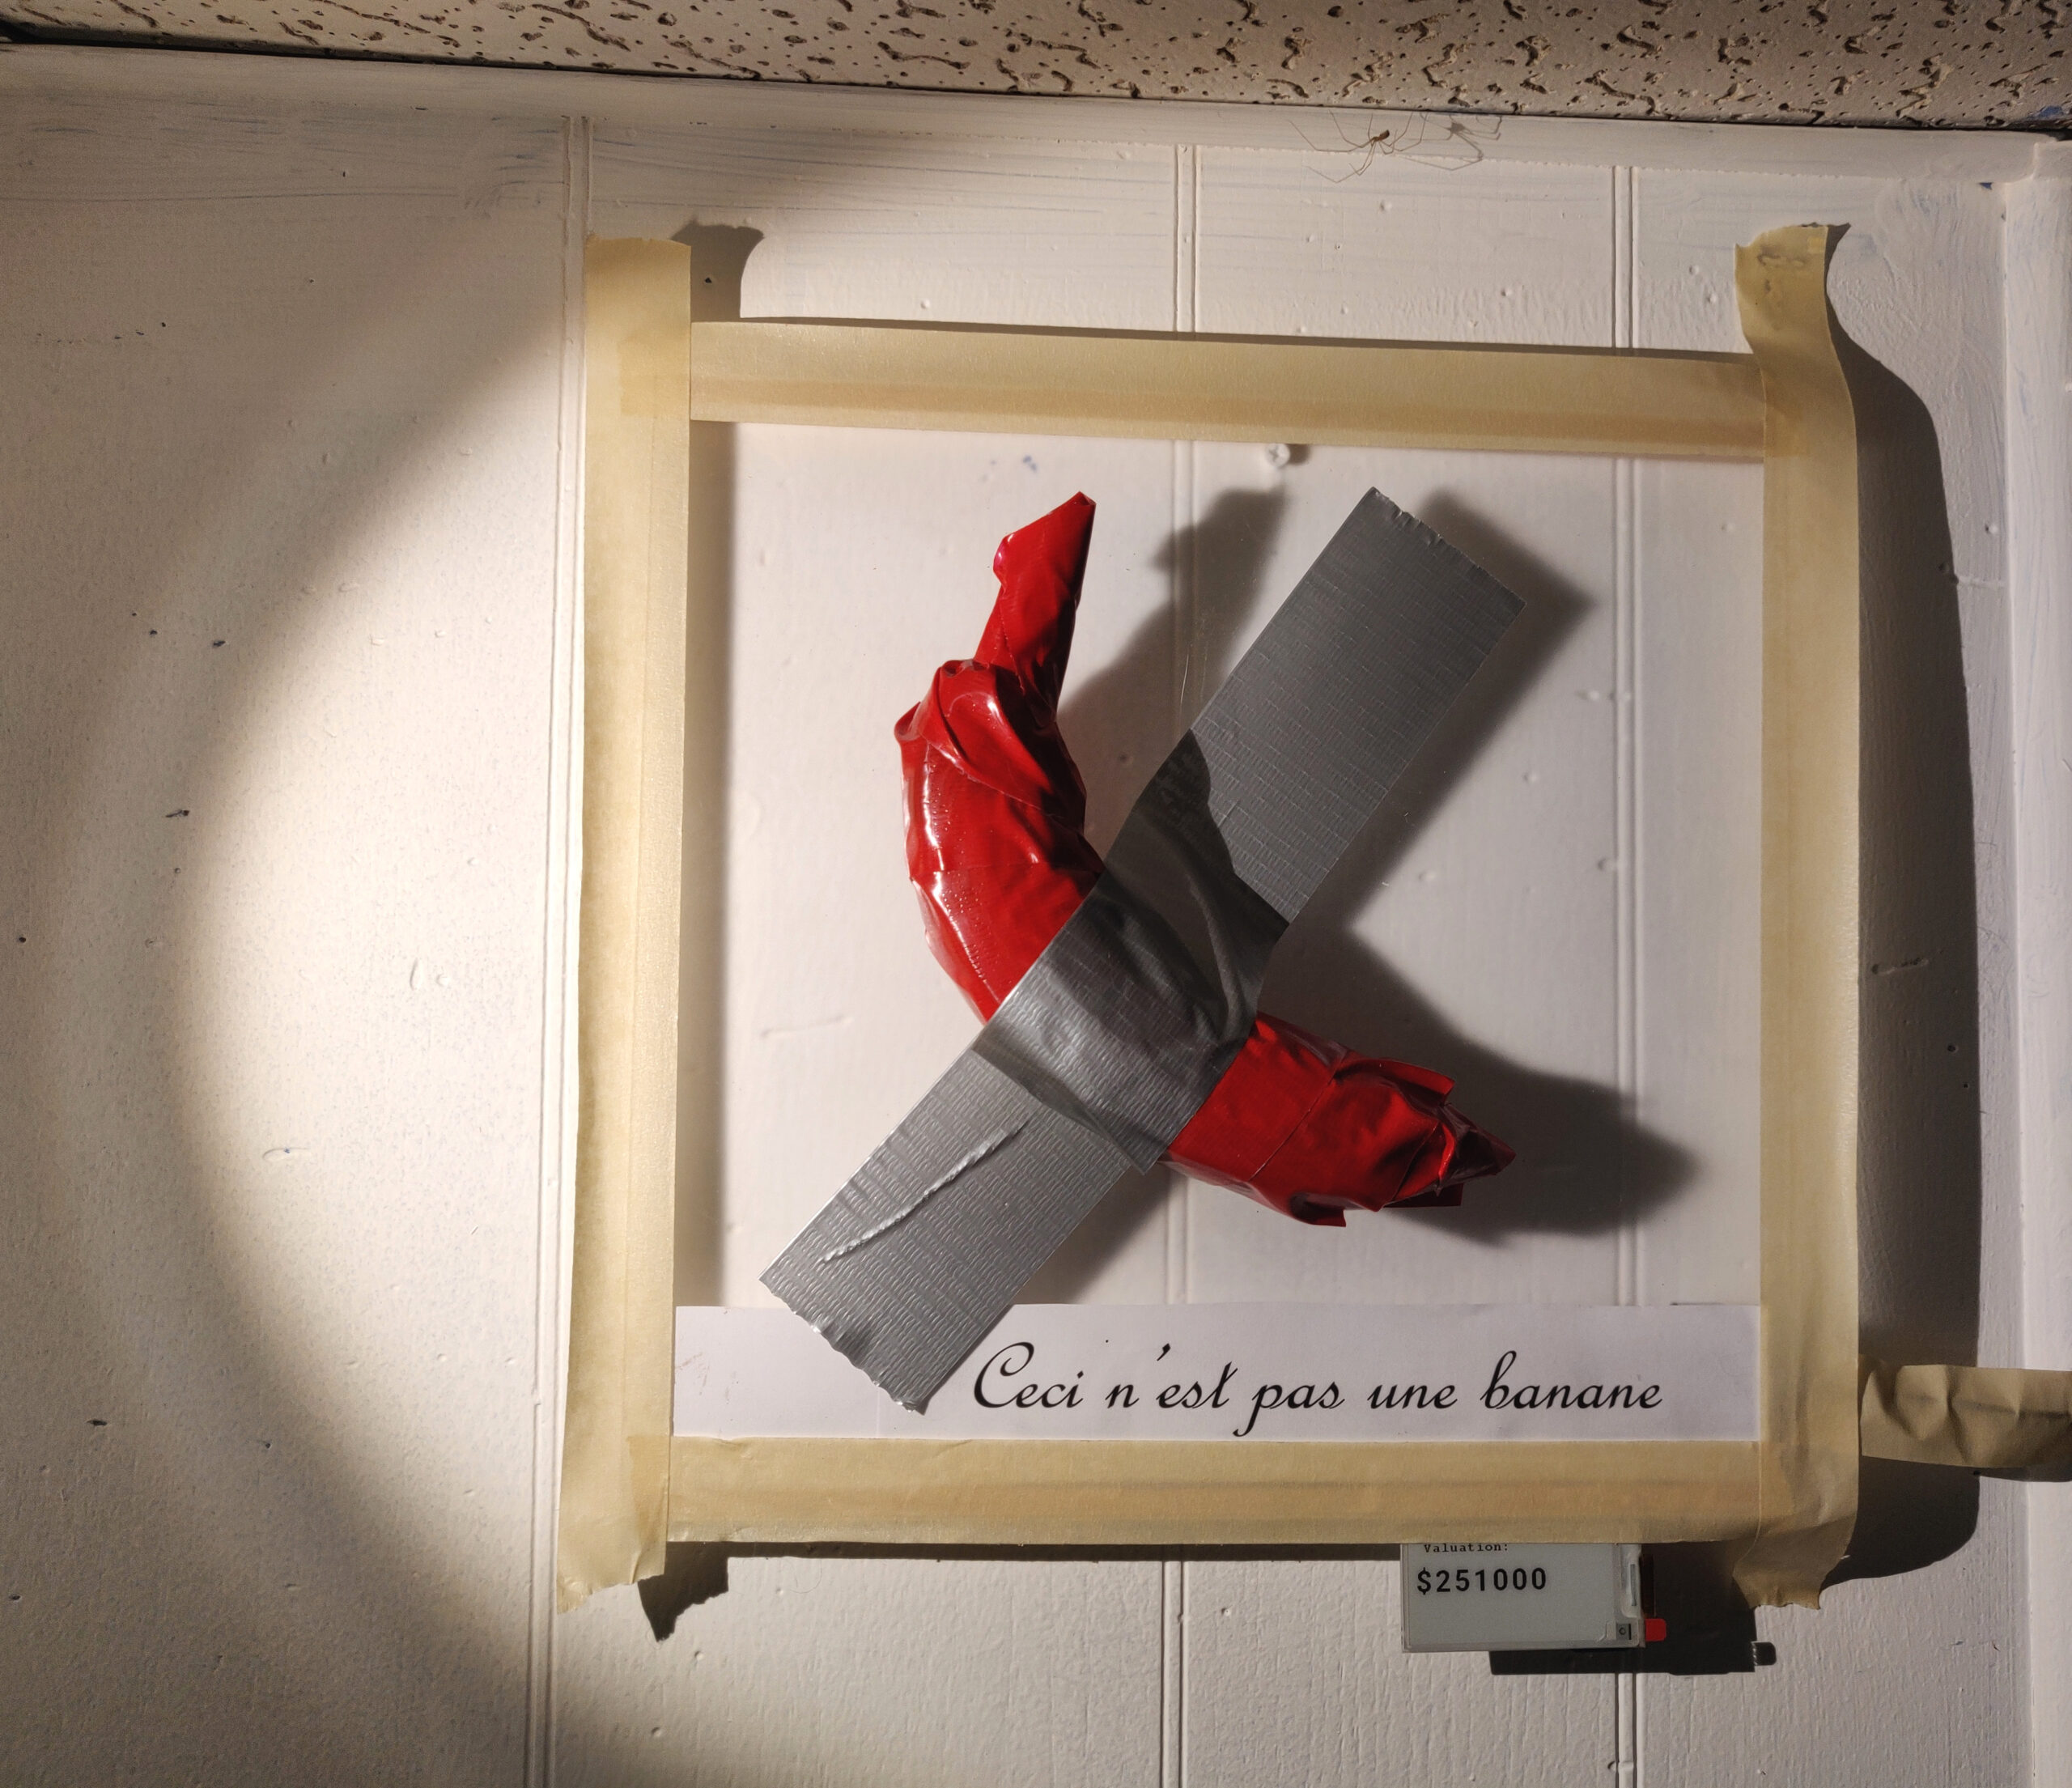
Suppose you find yourself in possession of a pricey objet d’art that may or may not be original. What’s a proud owner of a ripe asset – or a rotten bunch of copycats living on the dole of others, under menace of expensive lawsuits – to do? Luckily, modern copyright law provides for both! As a worked example, and in homage to the naming conventions of creative types, I present “Original Work”, an original work4.

Original Work features an unknown object wrapped in an obscuring covering, with a realtime pricetag assessing its current value and an anti-tamper feature.
Assessing Value
The best way to assess value is to create it. Under US copyright law, statutory damages provide a convenient means to assign virtual value to unappraised bits and atoms of dubious utility. This is particularly of interest where the actual damages to an aggrieved, or the alleged gain of the infringer, are unknown, nebulous or extremely hypothetical (i.e. plainly nonexistent). A plaintiff can recover statutory damages “whether or not there is adequate evidence of the actual damages suffered by plaintiff or of the profits reaped by defendant.” (L.A. News Serv. v. Reuters Television Int’l, Ltd., 149 F.3d 987, 996 (9th Cir. 1998)).
As of this writing, the absolute minimum statutory damages are $200USD per innocent infringement or $750 per willful infringement, but may range up to $30K-150K a pop.
Just for fun, since we don’t know if you, Dear Reader, are a pirate (the sort of captain of industry who can pay $millions$ for an original wall-banana) or a pirate (you wouldn’t steal a wall-banana…?!), my Original Work caters to both.
In the event of a Pirate Encounter of the first kind, we need to know what kind of damages we can recover from the filthy thief who would steal our Original Work. Since copyright extends to expressions fixed in a tangible medium, such as disks of spinning rust or memory cards, and including faithful reproductions, we’ll use the photo of the work on this blog as a proxy for the original, and since as you know, every download is a lost sale (just ask the RIAA!), we’ll increment a count of infringing downloads every time the image is viewed, and valuate them at the innocent infringement minimum of $200 per view.
Risk Management
But what if our Original Work later turns out to be infringing on a previous banana, and we’re the ones wearing the eyepatch? Since the Supreme Court would never reverse itself, we need to hedge against this possibility too. Luckily, here a shitty law known as the DMCA has our back, Section 1201 (anticircumvention) specifically. Let’s make it illegal for enforcers to find out! All we need to do is wrap the secret copyrighted material in a technological measure that effectively controls access to the work. Here, the industry got exactly what it bought-and-paid-for, and “effectively” is interpreted to mean “has the intended effect of”, not whether it did so…erm, effectively5. Speaking of which, wielding the threat of ruinous litigation has the intended effect in most cases; whether the case would ultimately be decided for the defendant after a decade of war is a bit academic. To hear wielders of this weapon talk (with impunity, as the DMCA famously includes no penalty for specious threats of ruinous litigation, or even outright false claims), this famously includes Caesar ciphers (ROT13), Base64 XOr’ed with a constant, “programs” small enough that they are mistaken for a numeric constant, short publicly-available text strings, and plaintext public domain names in a text file, so we needn’t try too hard. Also of note, the section is written so that the mere act of defeating the technological measure (or even telling others how to do it) is the crime, even if the subsequent use of the work it protected is lawful.
Duct Tape to the rescue! Original Work features a mysterious object, completely smothered, appropriately enough, by red tape. Now, I’m no stranger to the stuff, but since duct tape is already a component of the work, we may as well lean into it, hmm? In Original Work, this technological marvel completely enshrouds and conceals the mystery object within, with the effect of controlling access to that object in a way that requires circumventing the technological measure to find out what the mystery object might be. Now, since courts (or your competitor’s attorneys) may be inclined to read the technological measure verbiage as requiring a computer, one could hypothetically hedge against this by painting stripes of conductive glue over the mystery object before wrapping it up and wiring them up to the valuation circuit, detecting the change of resistance as attempts to peel the tape break the glue lines, and deploy a countermeasure. Said countermeasure could hypothetically include immediately zeroing all records relating to the valuation counter, or hypothetically filling the object with gunpow…ahem, the author does not condone violence or the destruction of valuable cultural art-ifacts, and any technical countermeasures are left as exercises to the reader.
For the downloadable proof of concept, attempting to reveal the object immediately hides the valuation (sets the display to $0) and halts.

Behind the Tape: Making of Original Work
Main components (shopping list) for Original Work, in case anyone is brave enough to build their own:
- Clear acrylic sheet (picture frame cover), cut to desired size
- Scrapwood sticks (for standoff)
- Various tapes to artist’s preference (OW: red duct tape, silver duct tape, tan masking tape)
- Waveshare “Universal e-Paper Raw Panel Driver Board, ESP32 WiFi / Bluetooth Wireless“
- Waveshare 2.13-inch E-Paper Display (or artist’s choice with minor code changes)
- Web hosting (if you want your art to have value).
- Conductive Ink (e.g. Alinco “Wire Glue”)
- High-value resistor (likely M-ohm range) and smoothing capacitor (10nF range). Some experimentation will be required to choose values.
- Wire, glue (separate from the Wire Glue)
- Mystery object
The Waveshare board is based around an ESP32 Wifi module and is intended to be used with the Arduino ecosystem.
The software for Original Work consists of a Web counter script for tallying the statutory infringement value of the work (or faithful reproduction of same), and an Arduino sketch to implement the realtime value display and technical countermeasure to protect against infringement claims in the incoming direction. Software package can be downloaded here. The Waveshare board requires some additional libraries be installed for the e-paper support; follow their setup instructions, and change the Wifi info in the sketch to match your own network.
Step 1: Tamper Detection Trace
First, choose a mystery object, and thoroughly protect it by painting on a conductive anti-tamper trace that zigzags to cover its entire surface. Once wrapped in strong tape, this trace will be destroyed by any attempt to peel off the wrapping, causing a detectable increase in its resistance toward infinity. Ideally, your conductive paint should:
- Stick to the wrapping/tape better than the object
- Break easily if tampering is attempted
- Result in a measurable trace resistance in the 1k-10M ballpark to keep the measurement electronics simple (this range works with the ESP32 ADC on the Waveshare board; YMMV for other hardware).
- Be relatively stable over temperature, humidity and aging (though the tamper detection function will ride through very gradual changes).
You may want to experiment with a test sample to ensure it’s compatible with your object material (adequate conductivity and adhesion) but is successfully peeled away by your tape.
Attach a wire to each end of the trace, using the same conductive material or any other convenient method.


For a permanent installation, I used a 3D-printed PLA form for the object, and painted on a single contiguous conductive trace pattern using Alinco Wire Glue, making sure to deposit it thickly across layer lines. Any conductive ink that gives a reasonably measurable end-to-end resistance (K-ohm to Megaohms range) for your desired object and coverage should work; a quick homemade recipe is acrylic paint and carbon black or graphite powder (if sold as pigment, not lubricant; they’re different), mixed to taste (heavy on the carbon). Ideally, your product provides a sheet resistance value or similar data that can be used to roughly estimate the resistance of your resulting trace. The acceptable range is very wide, but a too-low value (1-2 digit ohms) will put excessive load on your power supply and possibly cook something in extreme cases, while a value of many Megaohms could make the tamper detection too sensitive to noise, proximity, temperature, etc. instead of the increase that indicates tampering. When drawing the trace, the resistance can be decreased by adding width and/or thickness, or decreasing length if possible; it can be increased by thinning (removing width or thickness). Note, I used the Wire Glue product mainly because it was cheap and easy to source quickly, it turns out this stuff is not really that conductive (it’s really intended for point connections, not drawing traces), so the resistance came in pretty high, and an experiment with coating the trace in nail polish to control its peel-ability only pushed it higher.
In a real professional application, you might machine-apply such traces hair-thin in one or more layers between layers of epoxy, or alternately deposit and selectively-activate atom-thick layers of graphene oxide with a bedevilingly-thin laser beam, etc. (payment terminals and secure chips, etc. use many variations on the theme). But remember, we are mainly using the legal shield of the DMCA here, so it just has to count as a ‘technological measure’ (an electronic circuit evaluated by a computer chip should certainly qualify) and doesn’t actually have to be that effective, so big ugly hand-drawn traces are fine, and cases where it can be successfully bypassed are academic as that’s the point of the law.
As for measuring the resistance of the resulting trace, we really just need to get a ballpark estimate and choose a balance resistor value that will keep the ESP32’s ADC in-range (see next step).
Click for a quick diversion: Measuring high resistances without the proper equipment
Low-cost multimeters may not measure high resistances; for example, my cheapo home multimeter only measures up to 2M, and my protected object worked out to somewhere north of 10M. The meter’s limits are based on how the act of measuring (i.e. its internal circuitry) itself perturbs the measurement, but in many cases, the voltage measurement function is high-impedance enough to get a ballpark value even if the resistance mode isn’t up to snuff. An easy way is to place two resistors of the same known, high value in series across a known voltage, measure the midpoint voltage (which should measure exactly 1/2 the known voltage, per the voltage divider equation), then swap the mystery value in place of one of the known values and use the same equation to determine the value. Note, since the meter will put some non-zero load on the circuit to be measured, you’ll probably get a value a ways off the expected 1/2 value (remember, we’re abusing the meter here for a measurement it wasn’t intended to make), but as long as it’s in the right ballpark, you can use the difference as a fudge-factor for backing out the effect of the meter and estimating the true value. For example, over a 10M/10M divider my voltmeter read 3.5V instead of 5V for a 10V supply (30% low), and ~4.5V when the bottom resistor is replaced by the mystery trace, so we can guess the real value is about 30% higher, or ~6.42V, making the true resistance around 18Meg.
Write down the value (or your best guess of it) as we’ll use it later.
Step 2: Wrap the Object
Now, very carefully wrap the object in tape, being careful not to lift, “unwind” or reposition the tape once it touches as this will peel the trace and break the circuit. Ensure that the free ends of the wires remain exposed for connection later.
Step 3: Add Tamper Measurement Circuit
The actual measurement circuit is dirt-simple and can be airwired right onto the rear of the Waveshare board: in the lovely schematic below, the anti-tamper trace is denoted by “?”, and a known reference resistance (marked ‘Fixed’) is chosen to keep the measured value in-range, ideally roughly equal to the trace resistance to keep the resulting voltage near the middle of the measurement range (see previous section for measurement hints, of course you could just plug in different values until it works). To keep things simple the Arduino sketch mostly deals with noise via software averaging, but the optional smoothing cap shown (unmarked) will help take the edge off.


Under the Arduino environment, the onboard ADC is set up to measure voltage in the range of 0 ~ 3.3V and output it scaled to an integer value in the range 0 ~ 4096. However, the on-chip ADC is not that good and will cut off near the extremes; this is why it’s important to choose the fixed resistor to be roughly in the same range as the anti-tamper trace to keep the measurement closer to the center of the range. If nothing else, with the anti-tamper trace as the ‘top’ resistor in the pair as shown, it’s fine to err high on the fixed resistor (which will push the midpoint voltage higher), since tampering will cause this trace to ‘disappear’ (go toward infinite resistance) and cause the measured voltage to fall toward zero, which will then be quite noticeable. In my case, the tamper-detection trace was ~18M, so I used a fixed resistor of 10M I had on-hand and called it good enough. For the optional capacitor, the value is extremely non-critical and you can use the RC time constant with your anti-tamper resistance (see calculator here) to pick a value in the range of 0.1s ~ a second or so. Again, for my ~10M resistors, 10nF worked well.
Step 4: Add Display
Attach the display according to Waveshare’s instructions for your selected display size and e.g. ribbon connector. Note the ribbons from the display and the latching sockets are very delicate; lift in the center (not one edge) to disengage the latch.
Step 5: Web Server setup
Upload the counter script to your web host; set the ‘Execute’ permission for the world and readonly for everyone but the owner (i.e. ‘chmod 755’). This is ancient technology and should Just Work; if using a hosting provider, check their documentation for any extra steps needed if it doesn’t.
Upload a representative photo of the art where you want to rack up putative infringements; link the counter script so it is hit everytime the page containing the art photo loads. The simple way is to reference it as an image, e.g. in an <img src=”…”> tag (it will return a 1×1 clear GIF). A slightly fancier way if you can embed arbitrary HTML; this allows the main page to render without waiting on the access to the counter script:
 <script type="text/javascript">
    var request = new XMLHttpRequest();
    request.open("GET", 'path/to/counter.php', true);
    request.send();
</script>
Step 6: Arduino Software / Testing
Follow the Arduino and Waveshare instructions to set up the pieces of the software environment. Unzip the sketch (under “Arduino” folder) from the download above to somewhere the Arduino IDE can find it. Open the sketch and uncomment the lines following “//Uncomment to debug analog anti-tamper values”. You can then use the Arduino IDE’s Serial Plotter or Serial Monitor to view the measurement value and upper/lower (computed) tamper bounds. The main things are to ensure that the measurement value is somewhere away from the extremes of the 0 ~ 4096 range (~2000 is great), isn’t jumping around drastically, and doesn’t move dramatically if a hand or other materials are moved near the object (if it does, the input may be floating or the resistances are too high). If it’s suddenly reading ~0, re-measure the anti-tamper trace and make sure it wasn’t damaged during assembly.
When finished, re-comment for normal operation. Be sure to update variables at the beginning of the file (counter URL, wifi details) according to your setup.
Step 7: Assemble Beautiful Art
Your imagination is your friend here and there are no limits. Tape accents are great for hiding things you want hidden. For myself, I assembled the artpiece on clear acrylic with scrap wood sticks as standoffs to provide space behind it to hide the Waveshare board, behind a piece of paper with text indicating what the mystery object definitely isn’t to any lurking copyright trolls. As a bonus, this provides an automagic drop-shadow effect with the right lighting, and allows changing the background color merely by moving the art to different colored walls.
- Morford v. Cattelan, Civil Action 21-20039-Civ-Scola (S.D. Fla. Jun. 9, 2023) ↩︎
- “I know it when I see it” – no, wait, that was a different case. ↩︎
- “It is an axiom of copyright law that the protection granted to a copyrighted work extends only to the particular expression of the idea and never to the
idea itself.” Sid & Marty Kroft Television Prod., Inc., v. McDonalds Corp., 562 F.2d 1157. See also Feist, of course. And, just because I’m a software nerd, Sega v. Accolade for a similar vibe along the lines of whether “copyrighting the password” (a functional, not artistic, element) actually works (TL;DR: no). ↩︎ - In authentic fashion to Cattelan’s work, it’s actually a self-plagarism of a previous wall artwork, “Red Tape”, in which I hurriedly hung the unfinished work-in-progress for this post in my office following a decree that displaying my kids’ hand-drawn artworks there was insufficiently professional and had to be removed prior to an upcoming audit. I didn’t get much more detail on what “sufficiently professional” artwork entails, except that it comes in a frame, so… ↩︎
- Except in Finland ↩︎

Leave a Reply