Like the idea of magnetic poetry kits, but they don’t come with the types of words you want? Here’s an easy way to make your own, specialty kits.
Supplies needed:
Printer in working condition
Magnetic Sheeting – any kind that will feed thru your printer (such as Staples Inkjet Magnetic Sheets), or most any kind of magnets/sheets/tape with a suitably modified (gantrified) printer, etc.
Word processor
Plain text editor (aka format sanitizer)
Teh intarwebs
Scissors and/or paper cutter
Lacquer/enamel
Some other handy items:
Hex Editor
GOOD text editor supporting flexible find&replace… or scripting languages, etc.
“Oh great”, you’re thinking, another HOWTO telling me how to use my printer with specialty paper. For me, the hard part was in finding data sources and choosing all the words, so I’m not going to dwell much on feeding your printer.
1. Make Words
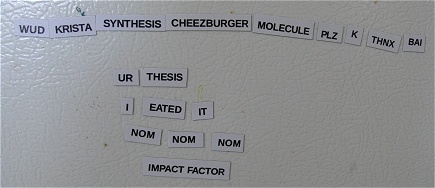
You might have some idea already of what you want on them. If you don’t have the list (or relative quantities) already pinned down, the Intertubes are your friend. In this example I make a lolchem (lolcat/chemistry) set for my gf. So here’s the nasty bit, getting your data sources in order. In this case, I started by kind of just ad-hoc throwing words seen on e.g. icanhascheezburger.com into the text editor, with some of the very common ones repeated a few times. For relevant chemistry terms (some of which I was not at all familiar with), I pulled them from this chem dictionary site by refreshing the random words link repeatedly and pasting any that I liked into the text editor. Depending on your browser or where (if not a web site) you copy/paste from, all the special formatting/markup might come along with it (links, funky fonts, etc.) if you paste directly into a word processor. I find it easier to just paste everything into Notepad first to strip the unwanted formatting. Finally, I needed to know what the most common words of the English language were for the remaining tiles. After a couple dead ends, I hit paydirt. Known as the General Service List, this page contains exactly that: A list of every (common) word in circulation, sorted by frequency (by analyzing a huge corpus of standard literature…this list circa 1991). All the words are listed one per line and prefixed by various numbers (frequency, etc.) that are of no use to us. To strip them, you could paste it into a spreadsheet program and copy only the last column back into a textfile, or find/replace for each of [0..9] and space. I did the latter, which was mildly annoying but only takes a minute.
The next step was to pipe the entire compiled list (chemistry and general terms) through the lolcat translator (http://speaklolcat.com/). This appears to enforce an output size limit, so only a handful of pages at a time if you have a lot of translating to do. Of course, choose data sources and any necessary translations/conversions based on your own needs. If your data sources are inconsistently capitalized, or you just want to change their case, something like http://www.convertcase.net/ will come in handy.
Now you have a list of words in plaintext, it needs to be formatted for printing efficiently. For example, all linefeeds have to be stripped and replaced by spaces. Many text editors’ find/replace doesn’t handle special characters like CR/LF, so I used a hex editor to make this substitution (a Windows CR/LF is ASCII code 0x0D followed by 0x0A). This done, it can be pasted into a word processor. Adjust the inter-word and -line spacing to your liking, leaving some room to cut the words apart. For mine, 3 spaces between words (again, find/replace works wonders here) and line spacing of 1.5 worked well.
2. Print Words
First, set your inkjet printer to “high-quality” or whatever they call the darkest, most ink-gobbling mode (temporarily disable any ‘econo-‘ settings too). You paid a bundle for this magnetic paper, no sense ruining it with drab gray text trying to save a nickel worth of ink. DO NOT USE IN LASER PRINTERS / PHOTOCOPIERS, unless the product is specifically desgned for this! Products not designed for high temperatures might just melt to your laser printer’s innards instead. If your magnetic sheets come with instructions, they probably say to print a test page on plain paper first and make sure you like the layout. You’ll definitely want to do this. You’ll also want to do at least one blank “test page” of the magnetic sheet itself, to see if it feeds through your printer and if any special assistance is required (e.g. gently pushing/pulling on the sheet as it prints). If the printer has an eject / forcefeed process (e.g. holding down the power button), you can use that, or simply print a blank document. You can see my first attempt ran into a bit of trouble from not following this advice. If you run into problems, it may help to hold down the forcefeed and wipe down any accessible paper rollers with a wet rag, rubbing alcohol or your fingertip, which will remove any paper dust and provide a bit of added grip.

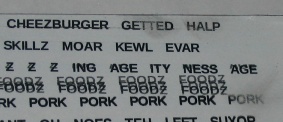
Sheets printed and dried
What happens if you a) don’t test-feed your paper first, b) rub the ink with your finger.
3. Lacquer words
Let your printed sheets dry thoroughly (several hours), then pick an expendable area/word on the sheet and use a wet fingertip to test if the ink stays put. If it smudges at all when rubbed, you’ll want to spray it with a coat of protective lacquer. This is good practice in general when dealing with greasy hands and sweaty fridges. Specialty ink-fixative products are available, but screw that – a light spray of Rust-Oleum High Gloss will leave your tiles smudge-free and virtually waterproof.
4. Cut Words
You could do this entirely by hand using scissors, but having access to one of those guillotine-style paper cutters to seperate the lines will speed things up considerably, not to mention provide straighter cuts. These can be found in the administrative area of most wage-slave environs (ask your secretary nicely), or most anyplace that has an “art department” (ask the guy with the beret nicely). Once all the lines are cut out, slice into individual words with scissors. Make sure you’re cutting a single strip; it’s easy to get a couple stuck together without noticing.

Use one of these to burn witches, roll heads, and cut your sheets neatly into strips

Finished product
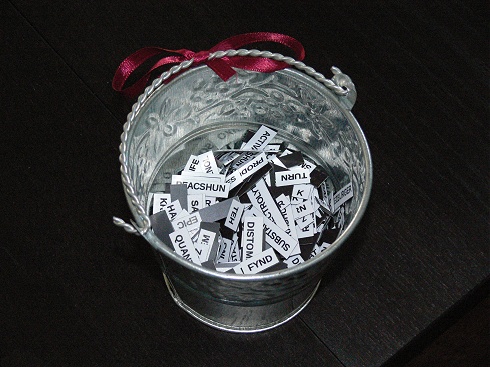
These of course needed a container…
Leave a Reply